Legendary Armor Skins/LAS/MOOG/Outfit Module Guide
This guide as also made by Columbus, if you'd like to contact me on Discord, please join the modworkshop.net server and ping me if you have any questions in #payday2-modding.
DISCLAIMER: THIS IS STILL A WORK IN PROGRESS, NOT EVERYTHING HAS BEEN EXPLAINED YET.
I just wanted to get this out to anyone who wanted to get started and have prior knowledge with Blender and modding other games first. If you a complete beginner, please wait until this guide is fully finished. Thank you.
Now to start...
Prerequisites:
-
Blender, you could either download it at Blender.org or through Steam
-
Any text editing software, I recommend Notepad++
-
PAYDAY 2 Model Tool (install .NET Version 6 if it does not run)
-
A hashlist of all the names and strings of materials and mesh names, if you do not install this to the root of your model tool directory, all your exported models will have a string of numbers for your materials and objects. This is an essential piece to install.
-
Any image editing software, such as Paint.Net, Photoshop, or GIMP
-
(Optional) Addon for direct .model imports to Blender io_scene_dieselmodeltoolwrapper This is a slightly edited version of the original made by Cpone that properly exports with tangents.
-
(Optional) Addon for merging bones while optional, I highly suggest downloading this since a lot of other models with different have various other twist bones, and merging them is a time costly task, this addon makes combining vertex groups much more easier and at way less time being consumed.
These are all the bare essentials you'll need to begin your path down modeling and porting models to PAYDAY 2.
Now let's move on.
Model Parser Tool
If this is your first time modding for PAYDAY 2, and you don't know what does what on the model tool, I'll explain a basic run down of each section, and tab.
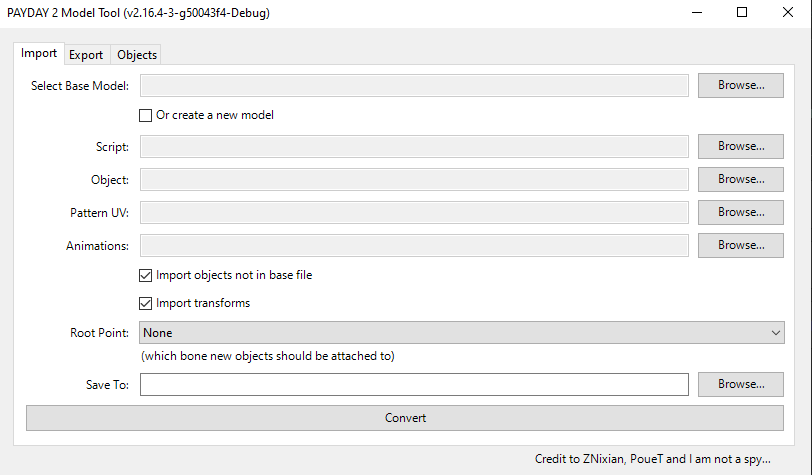
- For the import screen, this is where all the magic happens, The first section "Select Base Model" this is where you'll import the base model of what you're modifying. (side note by thot_patroll, if you are making a new model instead of replacing one then this can be turned of with the checkbox)
- The second section "Script" is what you'll be using the most (or least) to import your .glb file and have it be read by the model tool.
- Object is the alternative to Script, where instead of using a script to import your model and have it be saved/converted into a .model, you'll just import the .glb file by itself with no .mscript file to assist you in doing so.
- Pattern UV can be safely ignored since it is more suited for weapon modders, and that's what we're not here for.
- Animations can also be safely ignored, it is made for baking animations directly into the .model file, but we won't need that.
- The check boxes, Importing objects not in base file, and Import transforms, it's best to always keep those two ticked on, no matter the circumstances.
- "Save To: is where you wish to place your newly generated .model file in a folder.
Exporting your model file
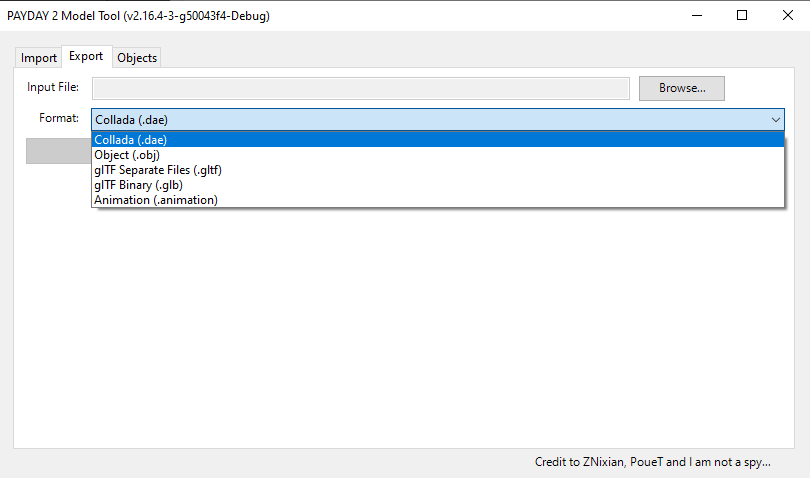
This is the export screen of the model tool, this is where you drag and drop your .model file and convert it to either a .dae .obj .gltf .glb or .animation
All I should say for this is that always keep your export format as a .glb format.
I will not go through a preview of the Objects tab since it is more meant for users who are more well-versed in model editing.
Now that we've gone through the basic rundown of the Model Tool, let's start to move into Blender. To export your first .model file, select the .model you want to export, I'll for example use Kento's model, located at "units\pd2_dlc_des\characters\civ_male_des" in the game files. you can use Diesel Bundle Viewer to extract the models.
Blender
Importing with the Model Tool Addon
If you decided to install the addon made by Cpone, there will need to be a little bit of setup before you can get it to work properly. First off, you can install it normally like any other plugin, but you will have to link the GLTF Model Tool Parser to correctly use it.
- Get where you placed your GLTF Model Tool Parser
- Click "Locate GLTF Model Tool (.exe)"
- Drag and drop your .exe file on the browser view of Blender and then click "Locate"
- If done correctly, you will see the path of your Model Tool Parser being shown in the file path
- You may now be able to properly import .model files directly
Importing with GLB/GLTF
When you export the model to a .glb a new file should appear with the same name in a glb format. Open up blender, and at the left of the screen there should a piece of text called "File" click on it and a new menu should appear, and hover over import, it should look like this if you've done it correctly.
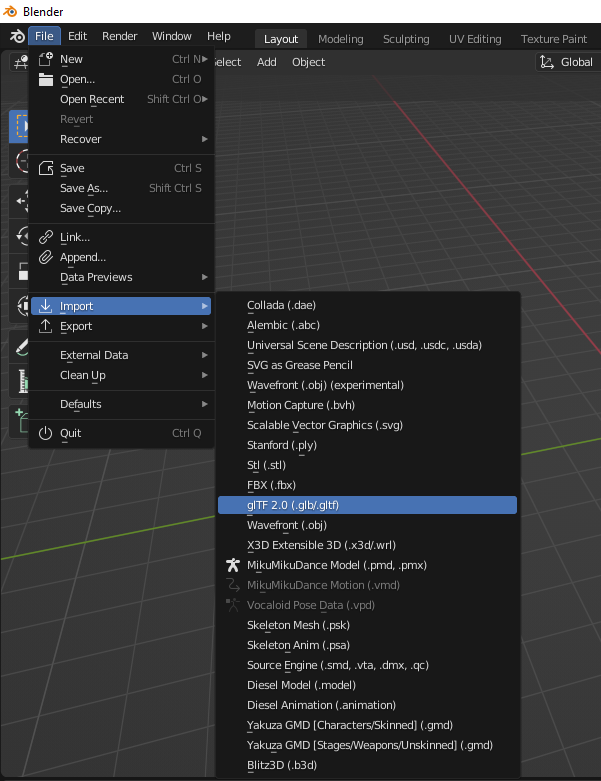
You're import file list won't be as big as mine since I have several plugins installed, but click the glTF 2.0 option and a new menu should appear.
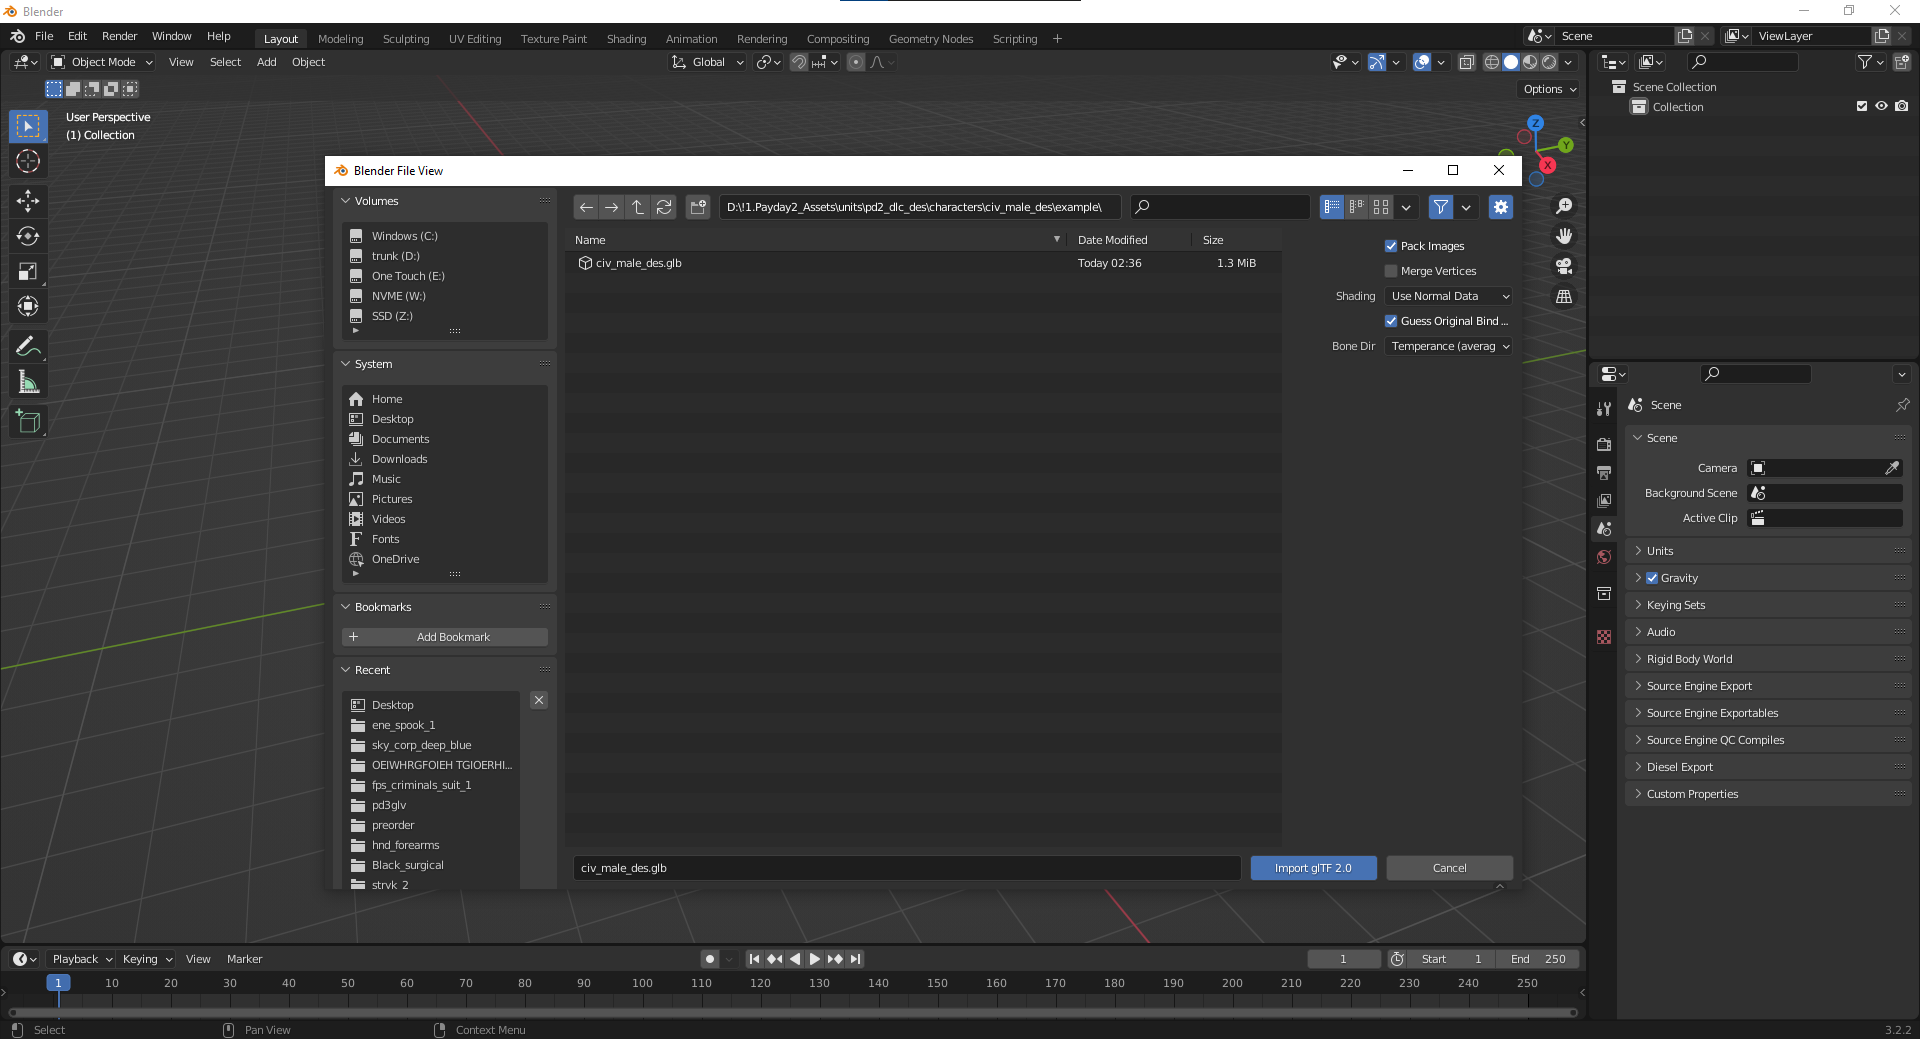
Right before you import, change the setting at the right side of the new window called Bone Dir, change it from Temperance to Blender, Blender 4.X has this option automatically selected. Dont mind the weird looking skeleton, if this step is not done then the model will be broken in game.
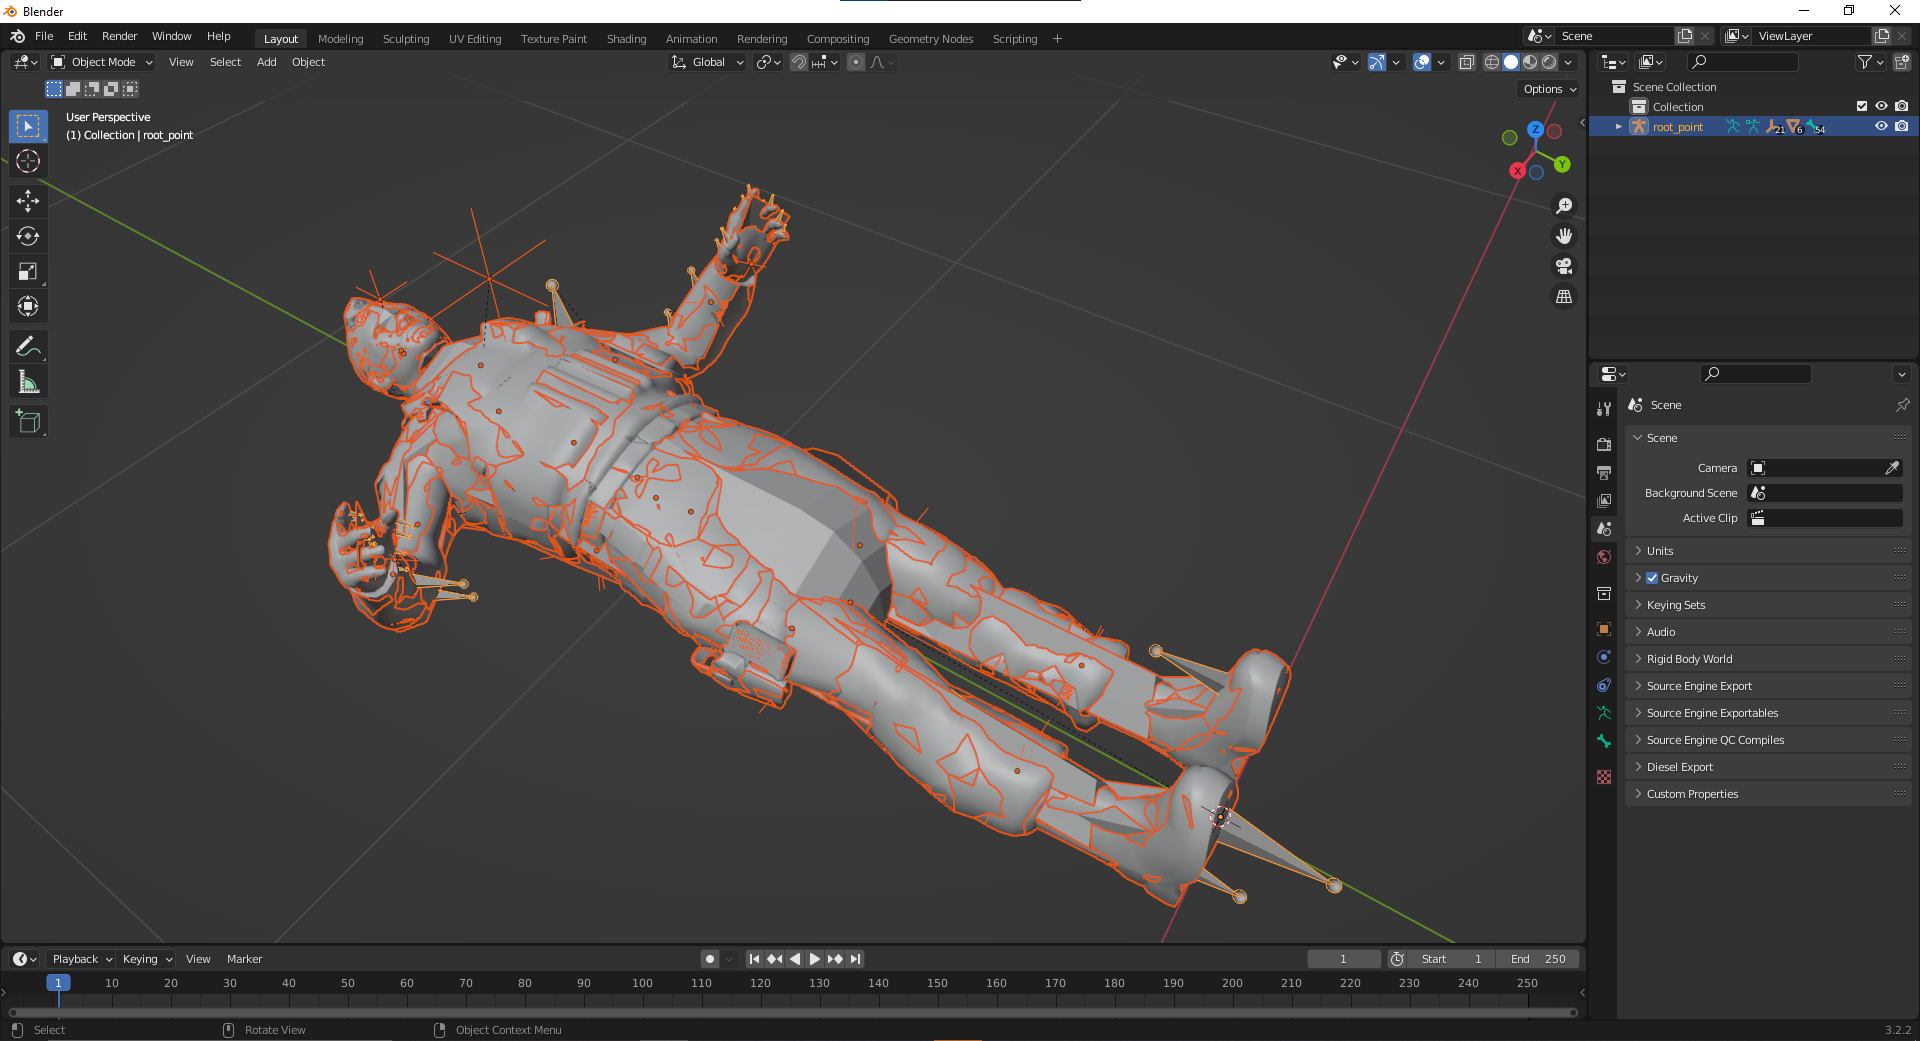
You've now imported your model that you'll be using as a base. Unfortunately if you're a new Blender user, this could be extremely complex at first, but if you're a experienced Blender user, new to PAYDAY 2 modding, this should be easy.
Now to begin, let me start off by saying that the model you want to insert must be in a humanoid shape or a human. Anything that involves animals that were meant to originally be a quadruped, will be impossible to import or to even look good. Additionally most models will have different proportions then the payday characters so you will have to either edit the model itself or scale/move the bones to try and cram it in.
I won't bore people with the details, since the process of converting a rig to PAYDAY 2's rig is different with each character since all rigs are made differently, but if you want a more fleshed out guide to wanting to make your model work with the engine, I suggest looking at THOT_PATROLL's guide linked here it goes into more detail of how to convert the model in Blender, this guide may be more for converting textures and going into render templates and setting up the textures and materials.
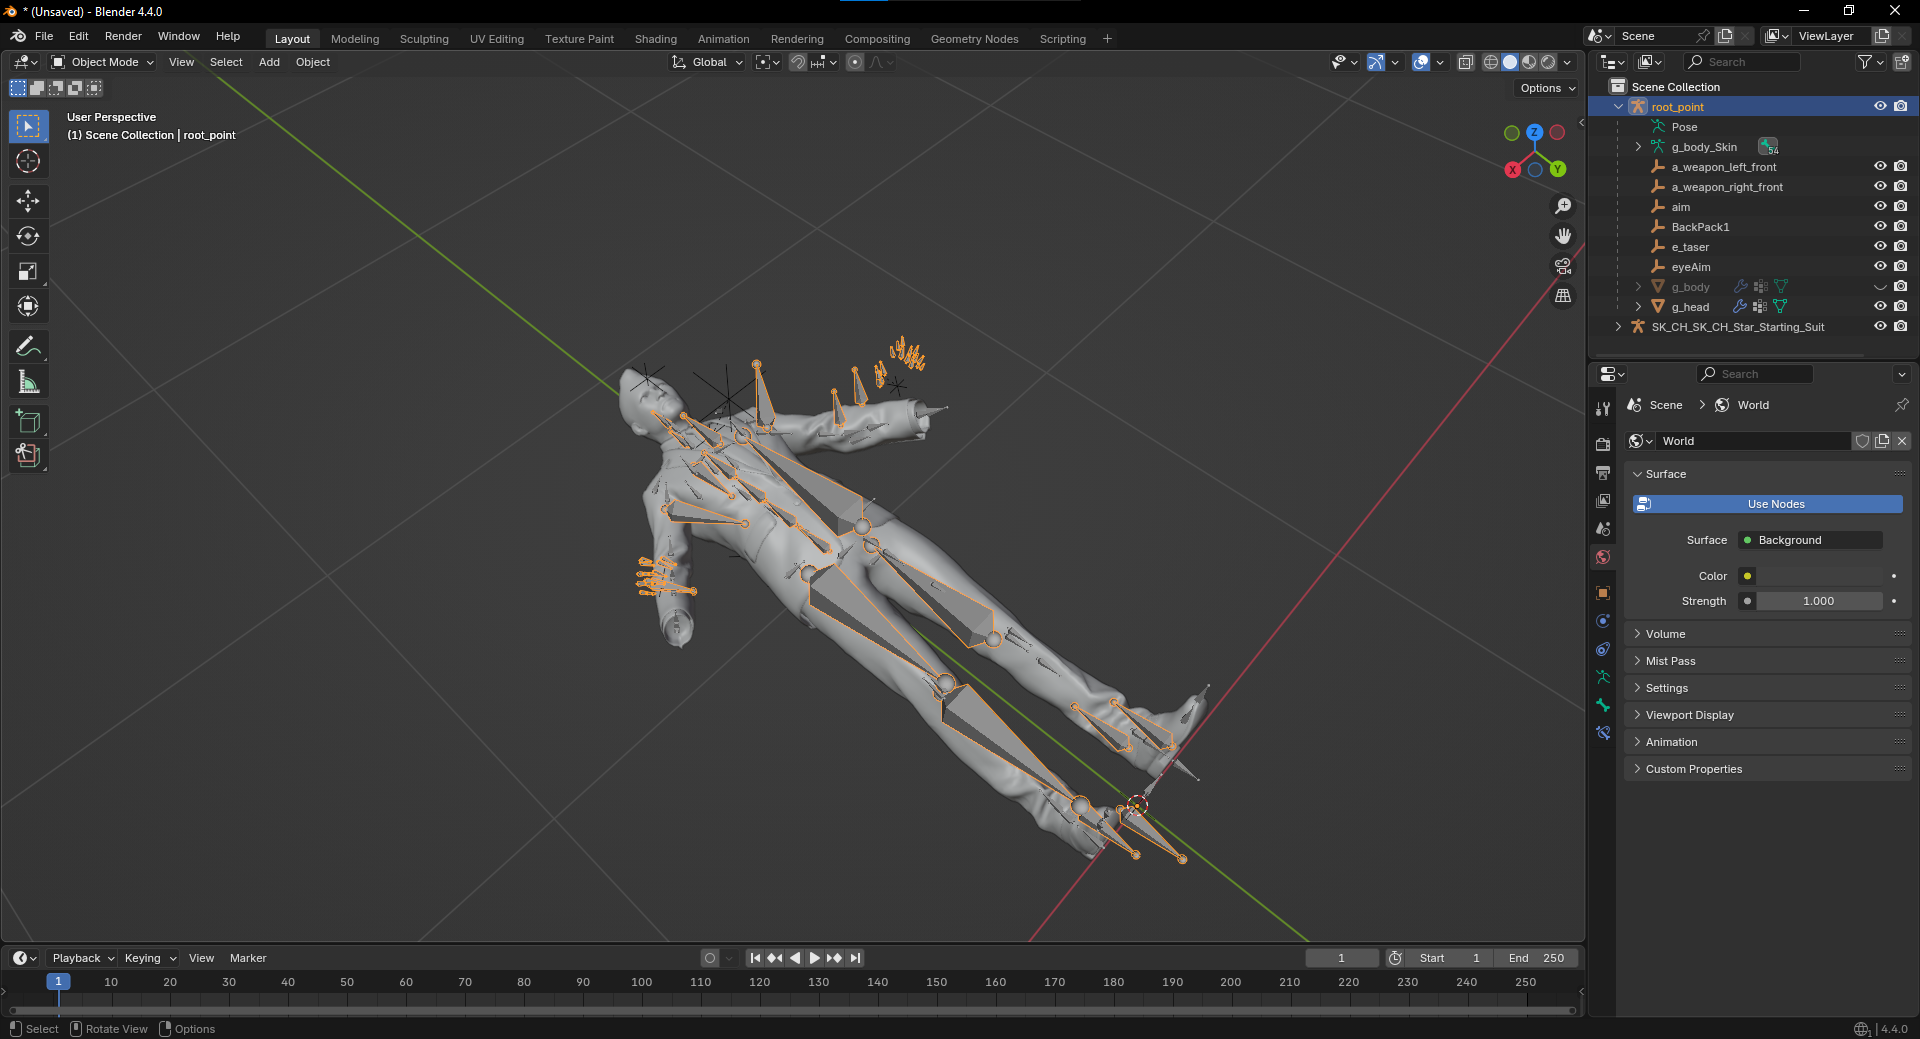
For the sake of an example, I will use Houston's body model when converting PAYDAY 3's rig over to be compatible with PAYDAY 2's rig. When a model is imported into blender, you will notice that sometimes the models of what you are editing is a bigger scale compared to PAYDAY 2. If you need to adjust the scale of a model:
- Select the rig of the model you are porting
- Click S to adjust the scale of the rig and then either type in "0.01" or 100 to properly scale the model for PAYDAY 2.
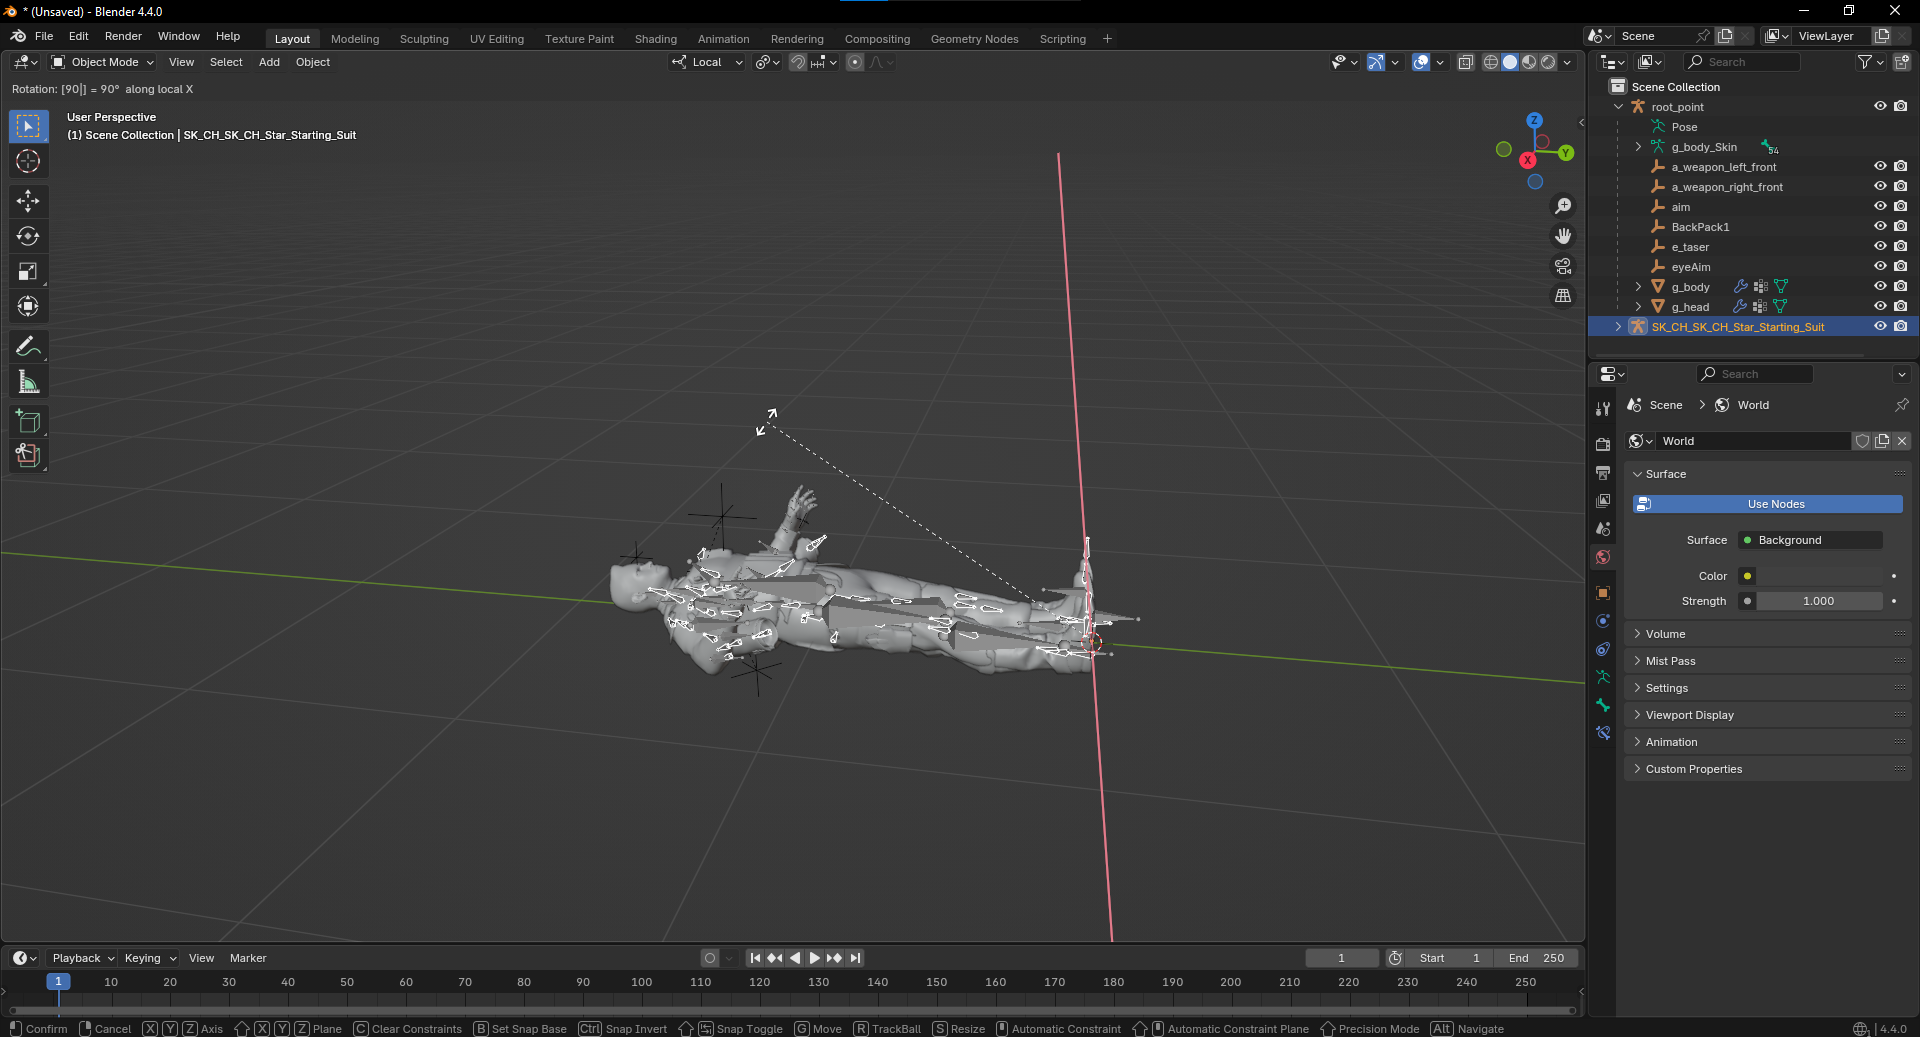
After that, you may also need to rotate the model to adjust to be right on top of the PAYDAY 2 rig, to do so, you can tap R on your keyboard and it will rotate the model around, to adjust the axis of position you want to rotate the model on, you can click X, Y or Z after you put your model in a rotation mode.
Now that you have your base model and the model you want to port directly on top of each other, now is the time you start to pose your model to fit the rig of the PAYDAY 2 rig. To enter pose mode, you click on the skeleton of the rig you are posing and hit "Ctrl + Tab" together to enter pose mode as a hotkey.
Exporting with the Model Tool Addon
If you are currently using the Model Tool Parser Addon, the export is as simple as importing the .model file.
- File > Export > Diesel Model (.model)
- You will see three export options you can choose
- Only Export Selected will only export what you have highlighted and selected in your current instance, useful if you are modifying several models at once or want to leave something out. Leave unchecked by default
- Leave "Apply Modifiers" unchecked since this will apply your armature modifier to your rig and make it static
- Leave "Correct Axes" unchecked unless you imported the model with it checked in the import screen
I will say that if you are modifying other models that aren't outfits or heister models (enemies or civilians) it is better to NOT use this export method since this will break hitboxes cause issues when attempting to shoot the models or trying to interact with them. You are better off exporting as .GLB and using a .mscript file to import with a base model that is untouched to prevent said issues.
If you are also having issues exporting, where when you export the model, but it does not properly make a new .model or override the old one, you may have an issue with your tangents, in which case you will also need to export as .GLB through the Model Tool Parser normally.
Exporting with GLB/GLTF
Once you have completed your model in Blender, and would like to export, there are some settings you should check or uncheck before you export it.
Tangents
It is highly important that you export with tangents on your model so that your normals will not look bad when importing the model into the game and previewing it. The setting can be found under
Data > Mesh > Tangents (Tick tangents so that there is a checkmark)
Vertex Colors
While this setting is highly situational for some users, most models will not need this setting enabled. The setting can be found under the same tab where tangents are located, just under the "Vertex Colors" tab, uncheck "Export all vertex colors" and when the file won't export the mesh with any vertex colors.
Materials
The materials are controlled by the material_config file. Each material will need to have a render template which is what tells the game what the material will do. So if you want a material to glow or have transparency then you will need a render template that supports that. There is a file that contains all the templates but most of the time you will only be using a few basic ones unless you need a special one.
For first person models you will need special materials that have "DEPTH_SCALING" in the render template. This makes the object render "infront" of everything else so it wont clip with other objects in the world.
Textures
Got your model all setup now? Good, now it's time to move on to texturing. The basic textures you will most commonly see with character models are color/diffuse textures or albedo depending on the game, a specular or roughness map, and a normal map. There are some more unique textures like metallic, emissive/illumination, transparency, ambient occlusion and others, but for now let's focus on the most common ones.
Albedo/Color Textures
Let's start with their color/diffuse texture, I will refer to it as diffuse now for simplicity. A diffuse texture is basically what everyone will see on the character and what gives them their look. Without a diffuse texture, the textures will just be a flat color, but let's not dive too deep into what they are, and more of how to work with them.
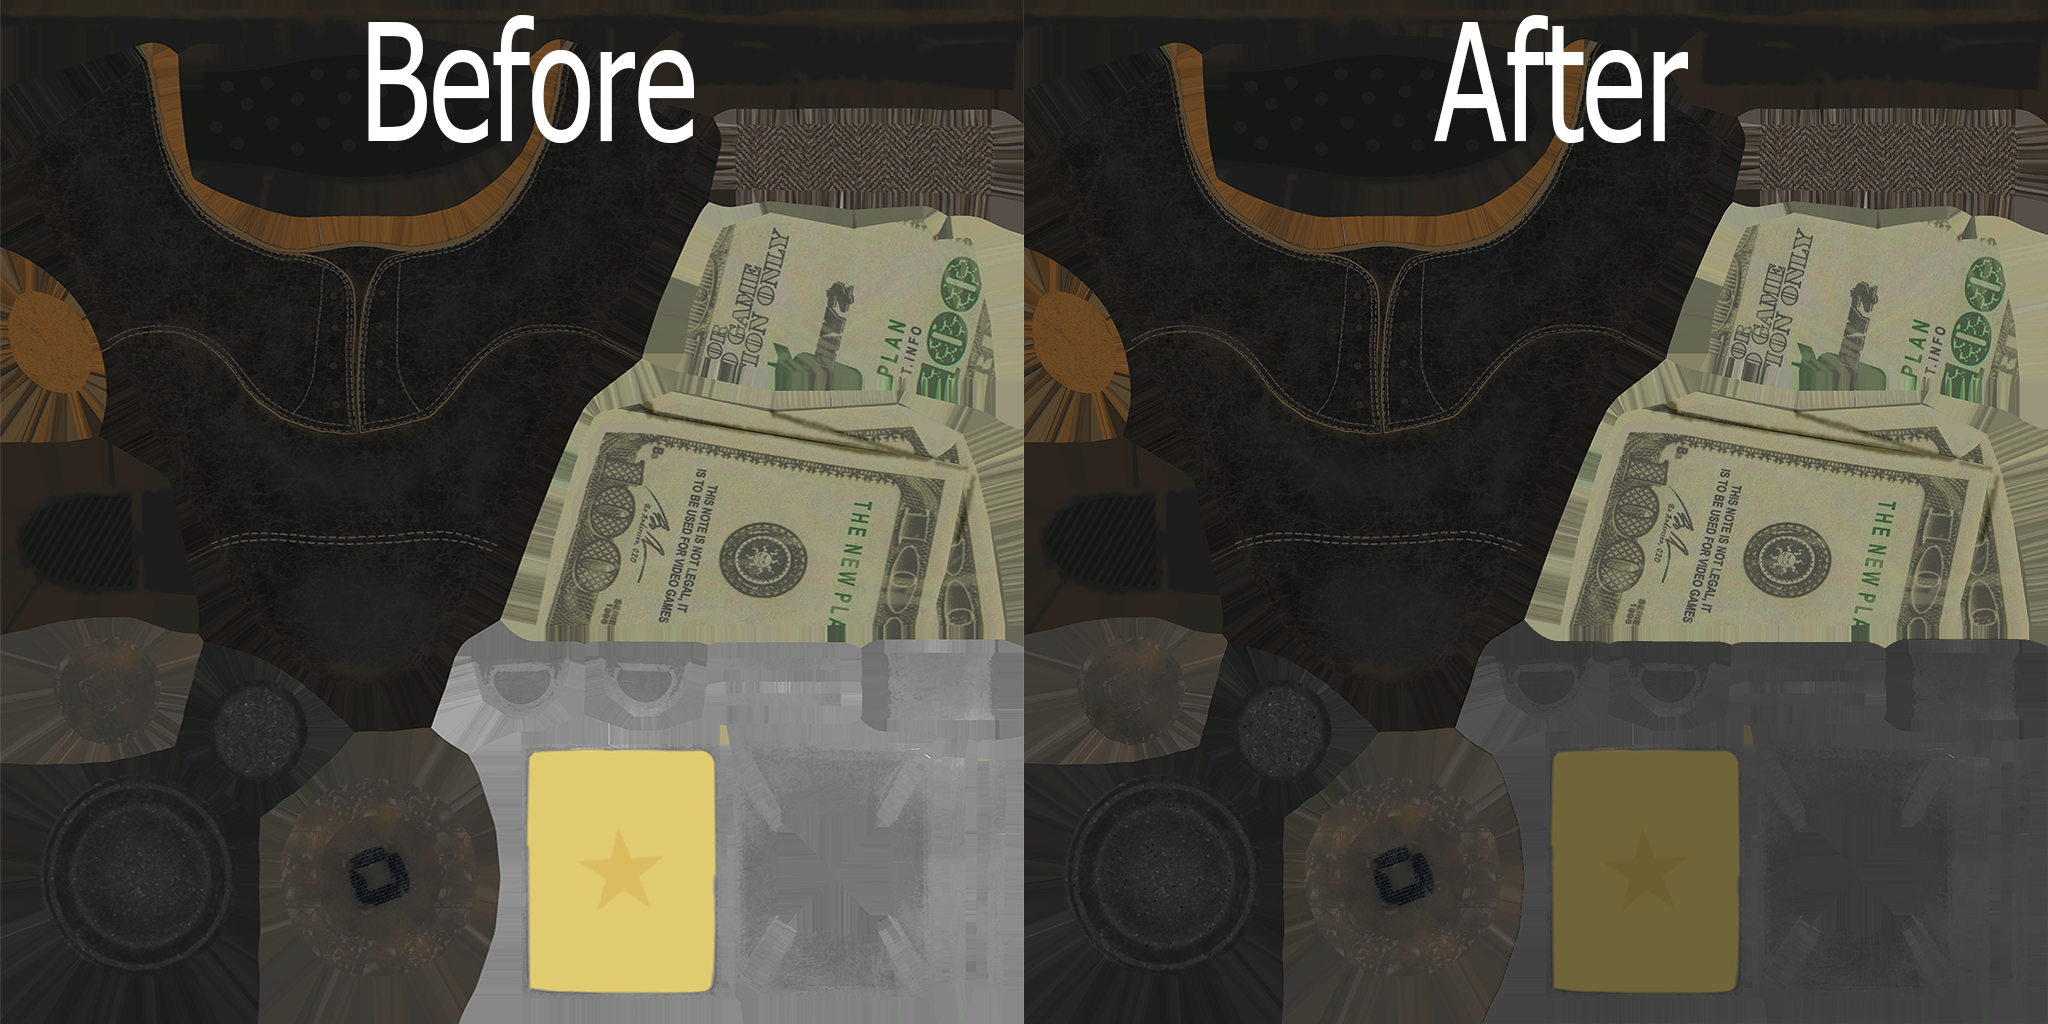
Ambient Occlusion/AO Textures
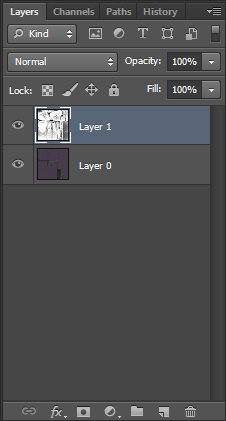
This is an albedo texture, there is no post processing effects on it, such as ambient occlusion or whatever else. If we were to import this into the game right now, it would not look appealing. To make it look good, see if the textures you extracted or downloaded have a "ambient occlusion" texture or AO for short. This will significantly help how your model would look. To apply the effect over the albedo texture, you will need a photo manipulation program like Photoshop or GIMP, I will be using Photoshop for the example pictures.
To apply a ambient occlusion texture, simply layer the texture on top of the albedo texture and adjust for scaling if the texture resolutions are different from one another, and once you got that all down, change the bar where it says "normal" to "multiply"
To apply this masking texture in Blender, you will need:
- a mix color or mix RGB node depending your version of Blender
- Plug your base color texture into your A slot of the mix color node
- Plug your Ambient Occlusion texture mask into the B slot of the mix color
- Set the blending mode of the mix color to "Multiply"
- Set the factor to a 1
- Plug the result of your mix color to the Base Color input of your Principled BSDF shader
Once you have done that, your new texture will look like this.

Notice how the AO helps give the texture more depth and darkens the wrinkles and areas where the suit is less commonly seen, this will help the texture looks much better when ported over to Payday 2.
Payday 2 commonly uses .dds files when creating textures and it is suggested that you should too, if you use Photoshop, you may download the .dds plugin here
/attachments/32)
Metallic Masking Textures
Next up I'd like to talk about textures have a metallic layer. Since this game doesn't support metallic layering, you will need to apply the metallic layer yourself on Photoshop/Gimp or Blender, this is similar to how we would apply our AO, but with a couple of changes. Firstly,
- layer your metallic mask on top of the color texture and apply the "subtract" for the metallic mask.
- adjust your opacity value of your metallic mask to 50% or 60%. This will instead make the area of the texture darker which is the result you want when baking your metallic texture into your color texture.
To apply this in Blender, you will need a:
- mix color or mix RGB node depending your version
- put your color texture into your A slot of the mix color
- invert your metallic layer using a invert color node and then put the inverted texture into the B slot of the node
- set the blending mode from "mix" to "multiply" and set your factor to a value of 0.5 or to a value you think looks good on your model
- then plug result into the Base Color node of the principled BSDF shader, this will darken the texture where the metallic layer should be applying.
Baking Textures in Blender
If you have gone through the setup of setting up the metallic or ambient occlusion masking textures through Blender, this section of the guide will help you learn how to bake the textures so you can use them in PAYDAY 2. To start off:
- A prequisite before you bake is to make sure your object isn't multi-material, this could cause issues, to fix this go into edit mode and separate your object by material
- In the shader nodes tab, make a new image texture and make it any resolution you would like it to be, I would stick to the resolution that your color texture was originally imported as
- Set your Render Engine from "EEVEE" to "Cycles" and set your Device from "CPU" to "GPU Compute"
- if the GPU Compute text is grayed out when you select it click on Edit at the top left of the Blender and then follow this route
- Edit > Preferences > System > Cycles Render Devices
- if you are using an AMD GPU, select "HIP"
- if you are using a intel GPU, select "oneAPI"
- if you are using a NVIDIA GPU with a driver version of 470 or newer, select "OptiX" and if you are using a older generation NVIDIA GPU, select "CUDA". Using your GPU to bake the textures rather than your CPU will significantly increase rendering times for the texture.
- Scroll down through the "Render" tab until you find a tab called "Bake"
- Change the Bake Type from "Combined" or whatever it was by default to "Diffuse"
To get a better understanding of how baking textures work, I will leave a video here I uploaded where I explained how to bake the textures in Blender and how to apply them properly in PAYDAY 2
Exporting
If you are new to making textures and don't care to mess with a GSMA texture, you could place your specular map into the alpha layer of your diffuse texture and save it from there. If you do make sure you save it as a "DXT5 ARGB 8 bpp | interpolated alpha" texture, if you save as DXT1, you will lose your alpha channel data and the model would end up looking extremely glossy. If however, you want to make a GSMA texture I will explain it now.
GSMA
A GSMA texture is a texture that was used more later down the development pipeline of Payday 2 models.
GSMA (Gloss, Specular, Material, Alpha)
The red channel of the GSMA texture will be the determining factor of what parts you want the shine from your green channel to be shiny or glossy. The red channel on its own does nothing in terms of adjusting the actual gloss values of the texture, the gloss and specular channels are linked together. An example I could provide is if your green channel is completely white and your gloss channel is black, the texture will have a shine to it, but if you increase the value of your gloss texture, the shine will turn more gradually into more of a glossy look.
The green channel of the GSMA texture is your main specular texture mask, this determines what part of the texture will be shiny or matte. If you are working with a roughness texture from a model that was ported from Unreal Engine, you could invert the texture and use that as your specular.
The blue channel of the GSMA texture is where you want your texture to either reflect a cubemap or only reflect lighting. If you are using a texture where you would like a steel reflection on one part, and the other part is plastic, you could apply a metallic mask layer from your Unreal model or other game engine texture and apply your refletion in the material config XML file. This will apply your steel cubemap reflection to the part you applied it on in the GSMA texture, and the plastic part will only reflect lights from your area.
The alpha channel of the GSMA is used in more rare cases when render templates (shader templates) specify that the GSMA alpha layer will be used for transparency in the material config file.
Normal Map/NM
Now that you've gotten the most important texture all setup and good to go, let's move on to the second most important texture, your normal map.
Normal maps come in all sorts of ways, depending on the game engine formats them, your X/Red channel could be layered in the alpha channel, while the Y/Green channel remain in the green layer of the image, which is more commonly seen with DXT5nm formatted normals, either that or your texture will be a blueish/purplish texture, with the X, Y and Z channels being in the red, green and blue channels.
Here is an example of the latter normal map I explained.

But it's not as simple as it may look here, some games rendering template could also determine how the normal map will really looks when importing it into the game.
OpenGL Normal Maps Compared to DirectX formatted Normal Maps
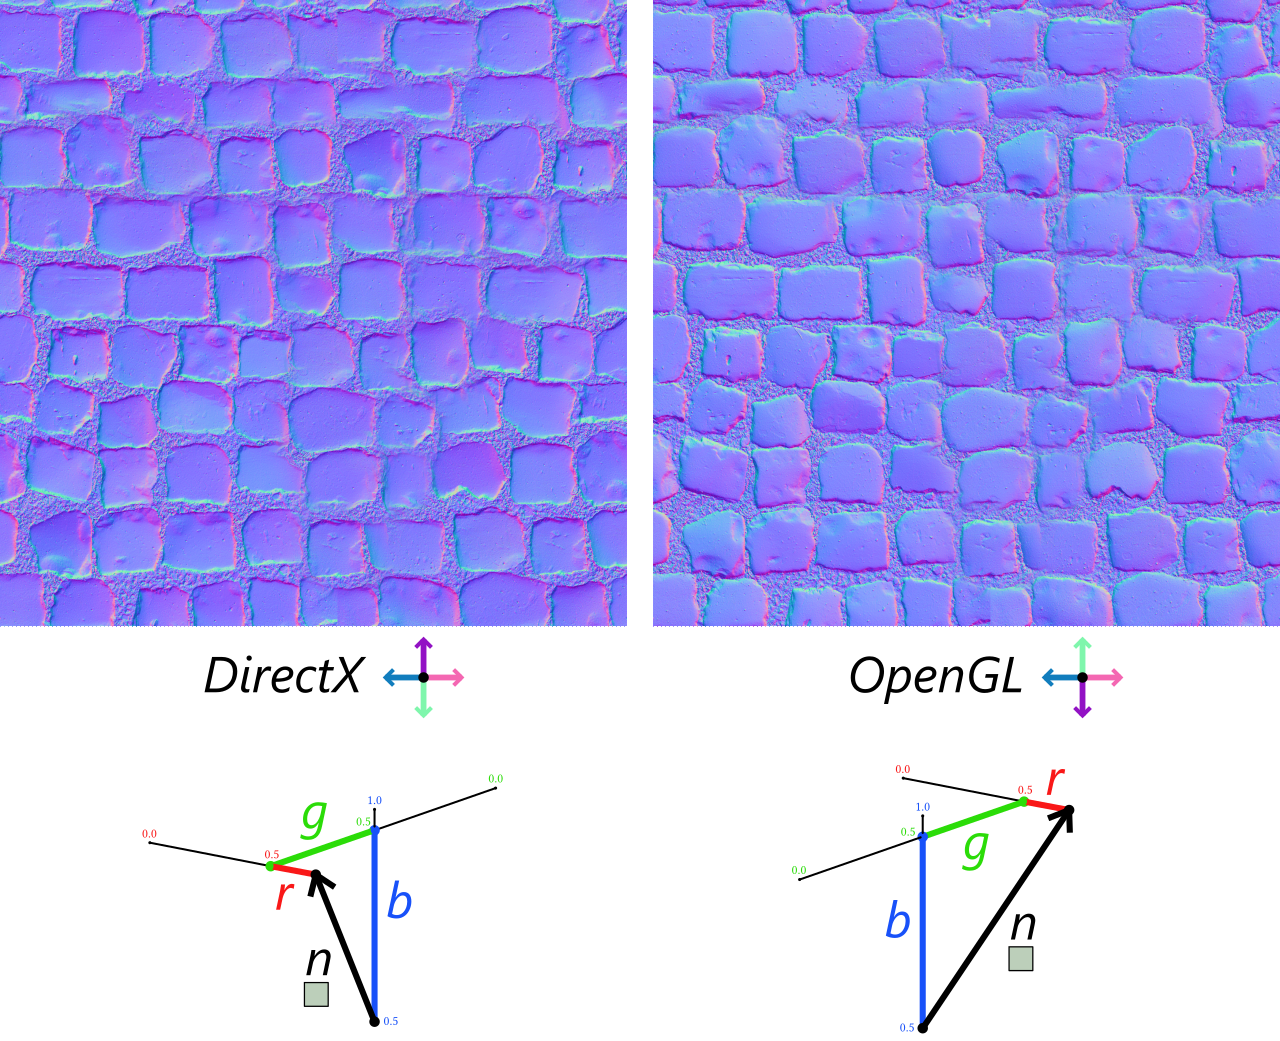
Games rendered using OpenGL will have the Y channel set to Y+, and games running on DirectX will have the Y channel inverted at Y-. If your normal map looks like the image on the left side image in the comparison, you will need to invert your green channel of your normal map, so that it looks more alike to the OpenGL normal map.
While this games renders with the DirectX API, you will need to format your normal map to the OpenGL format, this reason is because of when you export with tangents, normal vectors are used to convert normal maps from tangent space to world space normals when previewed in game.
So, with all that said, once you have finished all the other textures, now comes the time to format the normal map to be compatible with diesel engine. You will need to move some channels around. I will use a traditionally formatted normalmap as an example (directx). This is typically controlled on the right of your image editor of choice. We are going to copy the red channel onto the alpha. Diesel does not actually use red and blue channels, so we will simply make the red channel white and the blue channel black. This saves on compression. You may also need to invert the green channel. Once you’re done, the final result should be mostly orange. Because every Payday 2 normalmap uses an alpha channel, you must compress this texture with DXT5. Alternatively, you could not compress the texture at all, but this is generally ill-advised because of the higher memory usage. Memory being much more precious in Payday 2, because of the 32 bit 4 GB memory limit.
If you want to see for yourself how much this effects memory usage, you can use the -qa launch parameter to monitor this. I measured memory usage with the "-qa" launch parameter and the results were:
978-983 Mb | W/ Uncompressed NM Textures ///
950-954 Mb | W/ Compressed NM Textures.
These came from me previewing a weapon and changing its normal map textures and then refreshing preview to get accurate memory results
Render Templates
Now this is a VERY important thing to learn. Render templates is basically the shaders used to render your characters textures. Whether you want to use a diffuse texture or a normal map, the shader you use will determine all of that. To find a list of render templates that has been implemented, I'll leave a .zip file of render templates that are meant for static props and props that have weighting. Click this very funny hyperlink and you'll get redirected to download it.
To get started on what we're even looking at. Let's start with the basic render templates first that I and many other people will probably use the most for third person meshes.
Material Config Files
.material_config files are XML files that is used to define what render template you want your material to be, and what the textures are linked to it. An example of how it is commonly formatted is seen below
<materials version="3" group="Civilian">
	<material render_template="generic:CONTOUR:DIFFUSE_TEXTURE:NORMALMAP:SKINNED_3WEIGHTS" unique="true" version="2" name="mtr_body">
		<diffuse_texture file="units/payday2/characters/shared_textures/texture_body_df"/>
		<bump_normal_texture file="units/payday2/characters/shared_textures/texture_body_nm"/>
		<variable value="1 1 1" type="vector3" name="contour_color"/>
		<variable value="0" type="scalar" name="contour_opacity"/>
	</material>
</materials>
generic:CONTOUR:DIFFUSE_TEXTURE:NORMALMAP:SKINNED_3WEIGHTS
Templates basically highlight what textures you can use them for and what vector parameters you can insert in them. With this render template you can have whatever material is using this render template to:
CONTOUR: Have an outline when the character is behind a wall or whenever your view from them is obstructed
DIFFUSE_TEXTURE: This allows you to input a diffuse/color texture and this will be reflected on the material in-game when previewed.
NORMALMAP: This allows you to input a normal map texture which will give the material a fake bumpiness and lighting when previewed.
SKINNED_3WEIGHTS: Allows the model to use animations and have a limit of 3 bones per vertex. (There are other skinned templates you can use that are only 2 or 1 bone weight per vertex, but it is not advised to use on character models.)
While this is just a very basic render template, this is what many players usually resort to when porting models, if you would like to use different templates that have different functions: GSMA Texture support, Cubemap reflections, you can look in the material_config files that are found in game and take an example of how they are implemented.
First Person Rendering
Now to move on to first person rendering. You will need to make a new unit for the first person mesh since all you'll need is just a pair of arms, anything else will just clutter your screen or block it.
When it comes to the fps material_config's file, you'll need to include this node in your render template called "DEPTH_SCALING". What this does is basically render your arms over everything so that if you are near a wall or prop, your arms won't phase through.
generic:DEPTH_SCALING:DIFFUSE_TEXTURE:NORMALMAP:SKINNED_3WEIGHTS
This is the template you should use if you are making a character with only a diffuse and normal map texture. If you are using other textures such as a GSMA or an Illumination texture, you can find those in the render template database.
(Optional, but highly recommended)
If you want a pro-tip on how to find these templates you want to take a chunk out of, if you are on Windows 10/11 go to your search and type in "Indexing Options" and click enter, click "Advanced" then "File Types" where it says "Add new extension to list:" put "material_config" without the quotes fyi and when asked of how should this file be indexed, click "Index Properties and File Contents" what this will do is when you search for a render template in your file explorer tab, it would find if there is any matching text of the render template you pasted in. Mind you when you do this, you will need to rebuild the files you have indexed and it may take a while depending on how many files are on your computer or what drives or folders you have selected to index.
Illumination/IL Textures
Illumination is the texture used for glowing materials. It will look like a regular albedo/color texture however the non glowing parts will be black and the glowing parts will have the color you want. The brightness and bloom are controlled by variables called il_multiplier and il_bloom. They will look something like the code below and changing the value number will change their strength. There is a premade set of values that you can use which can affect the intensity of the brightness of the illuminated texture.
name="none" value="0.0"/>

name="identity" value="1.0"/>

name="match" value="0.4"/>

name="candle" value="0.5"/>

name="desklight" value="0.6"/>

name="neonsign" value="0.7"/>

name="flashlight" value="0.8"/>

name="monitor" value="0.9"/>

name="dimlight" value="1.0"/>

name="streetlight" value="1.2"/>

name="searchlight" value="1.4"/>

name="reddot" value="2.5"/>

name="sun" value="3.0"/>

name="inside of borg queen" value="6.0"/>

name="megatron" value="8.0"/>

All these values will affect the "il_multiplier" scalar if you decide to input the names of these vectors in the value area of the variable

example: <variable type="scalar" name="il_multiplier" value="inside of borg queen"/>

<variable type="scalar" name="il_multiplier" value="1"/>

<variable type="scalar" name="il_bloom" value="1"/>
Opacity/OP Textures
Opacity textures are used for transparent materials, they will be black/white with white being the parts that are visible and black being parts that are invisible. Parts that are partially white/black will be semi-visible
You will need a special render template to get this to work, but we'll talk about render templates later.
Opacity textures may seem simple on the surface, but the color channels do serve different purposes
Red = Fresnel Strength (This is a bit more confusing, if you're unsure how to properly control this channel, keep it the same as the green channel) (This feature is only available with render templates that support Fresnel)
Green = Opacity (Fairly straight forward, it just controls the scale of the opacity of the texture
Blue = Cubemap Strength (Think of this like a specular channel, this basically just controls the gloss of the texture if you want it to reflect a cubemap or have it be matte)