Basics
The basics of building and scripting a level.
- Controls
- Units - Building Your Level
- Elements - Scripting Your Level
- Continents And Scripts
- Sequence And Sequence Triggers
- Asset Management - Database, Packages, and Local Files
- Playtesting
Controls
Moving
After loading into your level, you can move the camera with W,A,S,D and go up and down with E and Q. Hold SHIFT while moving the mouse to look around. Scrolling your mouse-wheel while holding SHIFT changes your camera speed.
Selecting
Select something with LMB, add or remove something from the current selection with RMB.
You can box-select by holding CTRL and RMB while moving your cursor and box-remove from the selection with ALT+RMB.
Copy and paste your current selection with CTRL+C and CTRL+V, or delete it with DELETE. Deselect with CTRL+D.
Transform
Move or rotate your current selection using the widgets shown on screen. Toggle between them using R and T. Holding ALT while moving a selection will create an exact copy of it.
Grab your current selection with MMB and move it around with your cursor, place it by pressing LMB or cancel the grab with RMB.
Enabling the “Surface Move” option with CTRL-G will snap your selection to the grid while grabbing. The grid size can be changed by pressing PAGE-UP and PAGE-DOWN, or by manually typing it in the toolbar or editor options.
Misc
Save your level with CTRL+S or with the Save button in the editor panel. Toggle between Playtest and Editing mode using F10. To completely reset the level and reload the editor, simply press ESC and Restart Game.
Default Keybinds
These are the default keybinds for BLE.
All those keybinds can be viewed and customized in the “Input” section in the BeardLib Editor Menu Options.
| Function | Keybind | Alternative |
|---|---|---|
| Copy Selection | CTRL+C | |
| Paste Selection | CTRL+V | |
| Save Level | CTRL+S | |
| Undo | CTRL+Z | |
| Redo | CTRL+Y | |
| Delete Selection | DELETE | |
| Deselect | CTRL+D | |
| Toggle Move Widget | T | |
| Toggle Rotation Widget | R | |
| Toggle Transform Orientation | CTRL+T | |
| Toggle Editor Units | F3 | |
| Toggle Elements | F4 | |
| Toggle Surface Move | CTRL+G | |
| Toggle Snappoints | U | |
| Toggle Playtesting | F10 | |
| Increase Camera Speed | ] | SHIFT+MOUSEWHEEL UP |
| Decrease Camera Speed | [ | SHIFT+MOUSEWHEEL DOWN |
| Increase Grid Size | PAGE UP | |
| Decrease Grid Size | PAGE DOWN | |
| Increase Grid Altitute | SHIFT+PAGE UP | |
| Decrease Grid Altitute | SHIFT+PAGE DOWN | |
| Toggle Light | F | |
| Toggle GUI | INSERT | |
| Toggle Ruler | CTRL+R | |
| Teleport to Selection | CTRL+F | |
| Link to Element Managed List | SPACE | |
| Open Element Managed List | M | |
| Open Element On Executed List | B | |
| Settle Units | END | |
| Hide Selected Units | V | |
| Reset Rotation | NUM ENTER | |
| Rotate Spawn Dummy Yaw | J | |
| Rotate Spawn Dummy Pitch | G | |
| Rotate Spawn Dummy Roll | H | |
| World Menu | CTRL+1 | |
| Selection Menu | CTRL+2 | |
| Spawn Menu | CTRL+3 | |
| Select Menu | CTRL+4 | |
| Tools Menu | CTRL+5 | |
| Options Menu | CTRL+6 | |
| Spawn Unit | 1 | |
| Spawn Element | 2 | |
| Select Unit | 3 | |
| Select Element | 4 | |
| Spawn Instance | (not defined) | |
| Spawn Prefab | (not defined) | |
| Select Instance | (not defined) | |
| Select Group | (not defined) |
Unlisted Keybinds
These keybinds are not listed ingame and cannot be changed.
| Function | Keybind |
|---|---|
| Move Camera | W, A, S, D |
| Up, Down | Q, E |
| LMB | Select |
| RMB | Add to current selection |
| SHIFT (Hold) | Look around |
| ALT (Hold while moving selection) | Create duplicate |
| CTRL (Hold while moving selection) | Snap Grid to 1 |
| CTRL+RMB (Drag) | Box Select |
| ALT+RMB (Drag) | Box Deselect |
| MMB | Grab Selection |
| CTRL+LMB (Hold, Only Elements) | Add to On Executed list |
| CTRL+RMB | Add to current Group |
ALT+Hide Selected Units |
Unhides all hidden units |
SHIFT+Hide Selected Units |
Hides all not selected units |
| RMB (Hold)+Move Mouse left/right | Only in number boxes, increase or decrease the value |
| Output console | F1 |
Units - Building Your Level
You build your level using what’s called “Units”. Basically everything in this game is a unit. From the level architecture to props, equipment, loot, even characters.
Spawning
You start by navigating to the Spawn Menu and to the “Unit” tab. You can use the search bar to look for whatever units you need to build your level.

If you don’t know what exactly you’re looking for, you can always open other levels in the editor and see what units have been used elsewhere.
Clicking on a unit in the spawn list and spawning it will automatically load it into your level. Except for some rare cases you don’t have to manually load anything.
Now you can just place it into your level and move or rotate it however you like.


Settings
After placing units in your level, there are various settings for them:

Name: Lets you give the unit a custom nickname, so you can find it more easily when searching for it.
Unit: This is the path to the unit file, you can change it by pressing on the “Browse Unit” button next to it. Selecting a new unit path will actually change the unit, however a reload might be required to properly apply the change.
Continent: lets you change what continent the unit belongs to.
Enabled: Lets you enable and disable the unit. It will hide the unit and disable all collisions it may have. This does not save between restarts and units are always enabled when loading into a level, but can always be toggled with EnableUnit and DisableUnit Elements for the duration of the heist. For randomizations for example, just disable all unneeded units with a DisableUnit element when starting the heist.
Hide On Projection Light: Generating light projections will completely ignore any unit that has this option enabled.
Disable Shadows: Will disable any shadows the unit is casting.
Disable Collisions: Will disable all collisions of the unit. It cannot collide with any player or dynamic physics object anymore and won’t be affected by physics simulations. Additionally you will not be able to select it by clicking on it and must be selected via the Select Menu.
Disable On AI Graph: Generating your nav-mesh will ignore any units that have this option enabled. This can be useful when your Unit’s collision is too big and blocks too much of the navigation from generating.
Delay Loading: Units with this option enabled will not actually spawn in the level when playing and must be loaded in with a LoadDelayed Element. This is not very reliable and should be used with caution.
Units that have a Sequence Manager will have an additional Mesh Variation option, in which you can choose a sequence the Unit runs by default.

-> Sequence And Sequence Triggers
Some Units have special properties and will have additional settings when selecting them. For example with omni_light units, you can tweak the light settings, or dev_ladder which lets you change height and width of the climbable surface.
Another good example would be the zipline, on which you can customize the end position, speed, as well as slack of the zipline wire, or if it can carry loot or players.

Editor Units
Editor Units are only visible in editor and with the Draw Editor Units setting enabled. There are different types of editor units, most commonly Navigation Splitter and blockers, omni lights and collisions.
Don’t confuse editor units with the Editor_Only continent. Despite being called editor Units, most of them have to be loaded in the level to work, with the exception of Navigation Splitters, blockers and cover points, which are only used to generate the nav-mesh and should be moved into an editor only continent.
Some examples of Editor Units:
 Left to right:
- Vehicle Only Collision
- Occluder
- Player Collision
- Bag Collision
- Nav Blocker
- Nav Splitter
- Door Blocker
- Attention Object
- Cover Point
- Dev Ladder
- Omni Light
- Vis Blocker
- Target Hitbox
Elements - Scripting Your Level
To make your level actually work, you place what’s called “Elements”. They are what most of the level logic consists of. You can compare it to programming, but very much simplified, or visual scripting in other game engines, just directly inside the level itself.
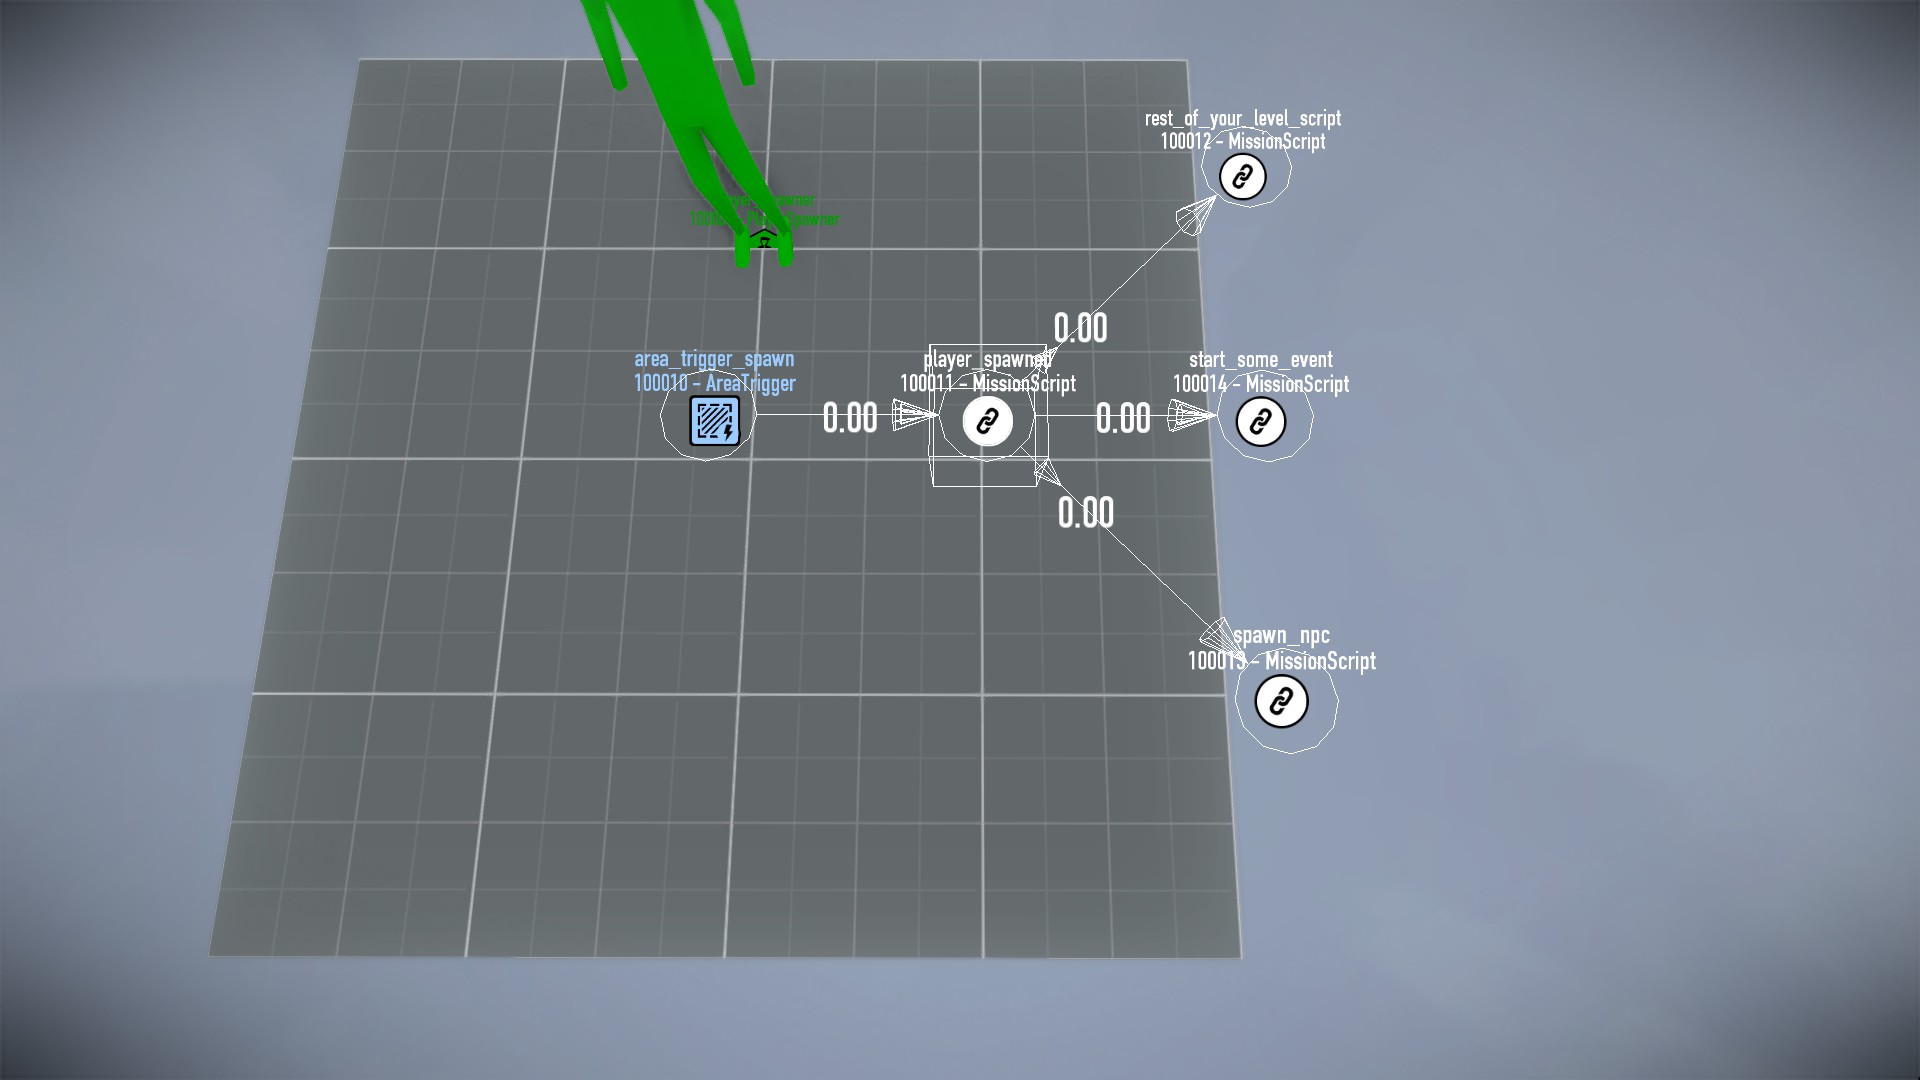
To script your level, you connect Elements together. Triggering the script with a Trigger element will then execute their task and execute the next Element in the chain.
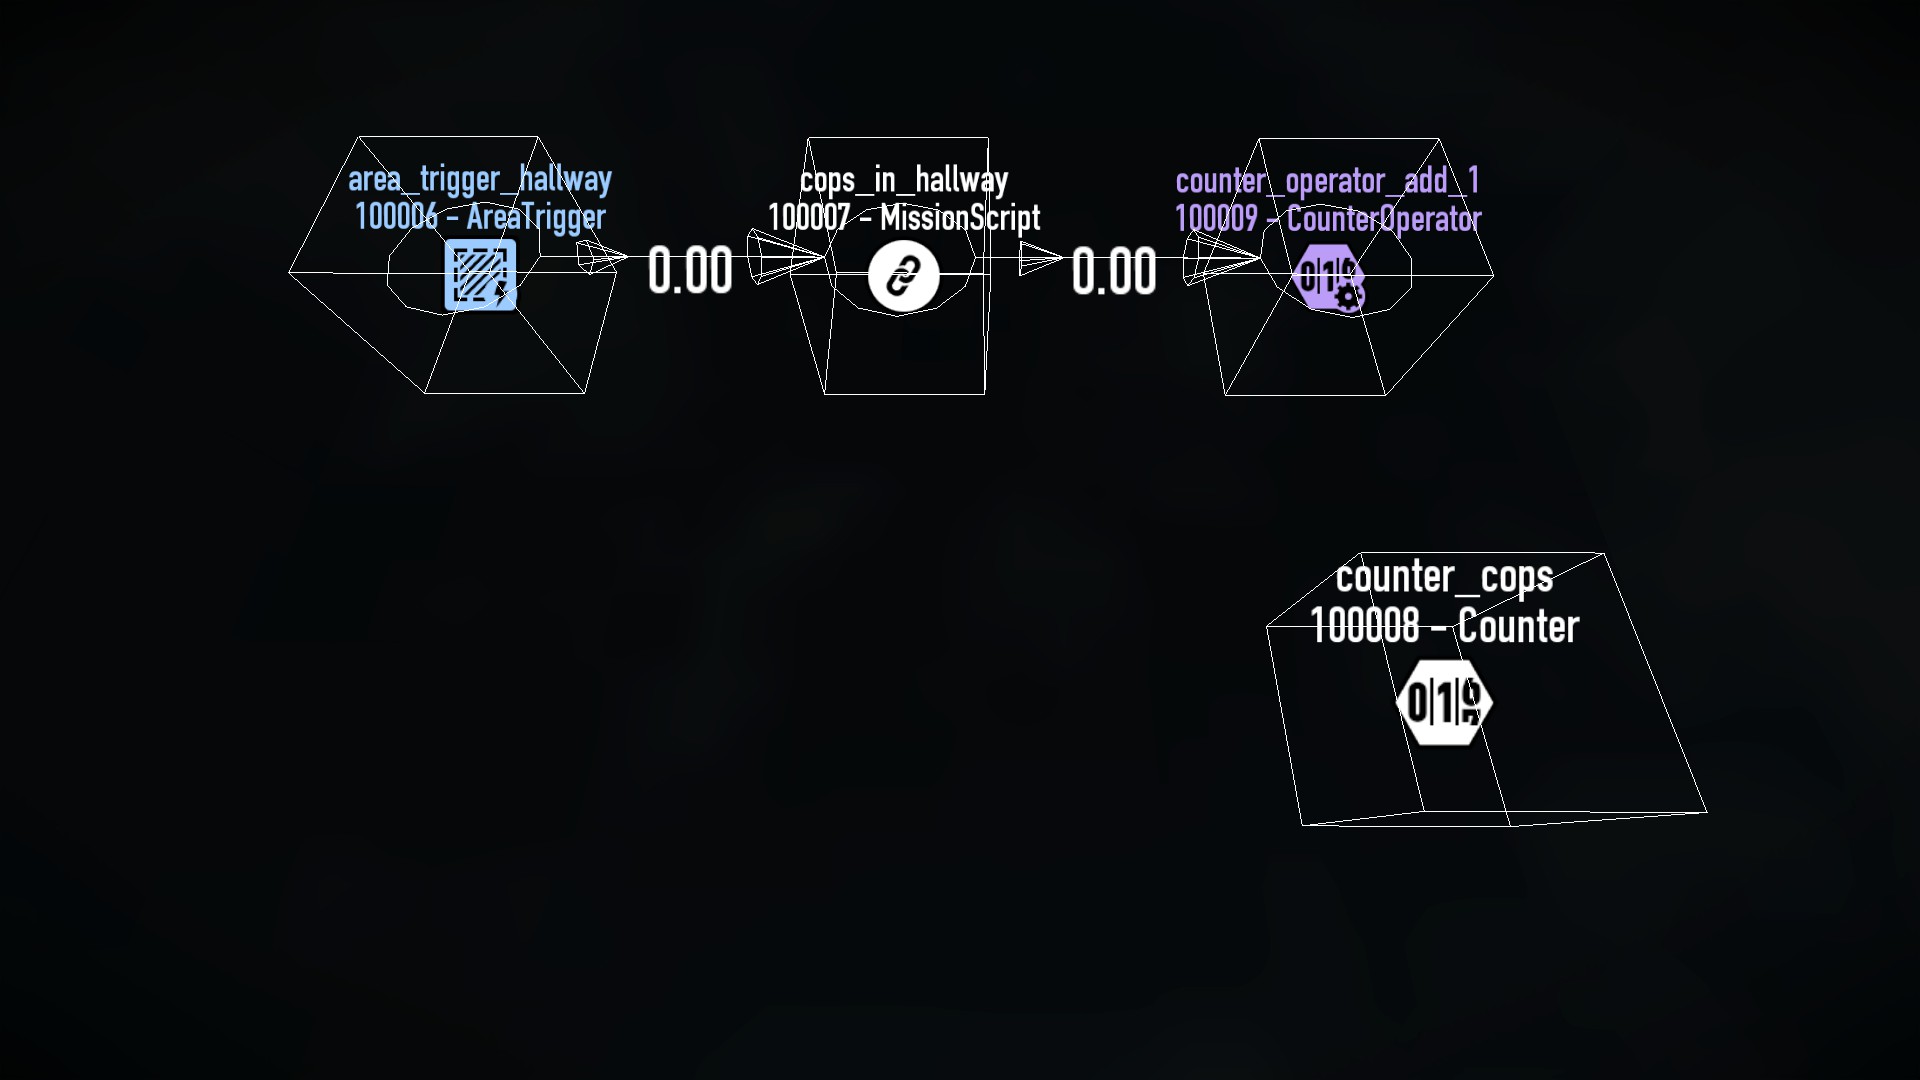 [Example: AreaTrigger triggers when cops enter its area, executes a chain of elements adding 1 to the counter]
There are a lot of different Elements, each with their own functionality and tasks. Most of the names already give you a good summary of what they can do, but you can always click the little question mark icon on the top to open the Wiki page with more detailed information.
Spawning
You start by navigating to the Spawn Menu and to the “Element” tab. You can scroll down or use the search bar to look for the type of element you need and click on it to spawn it into your level.

You can move and rotate them how you like to keep them organized.


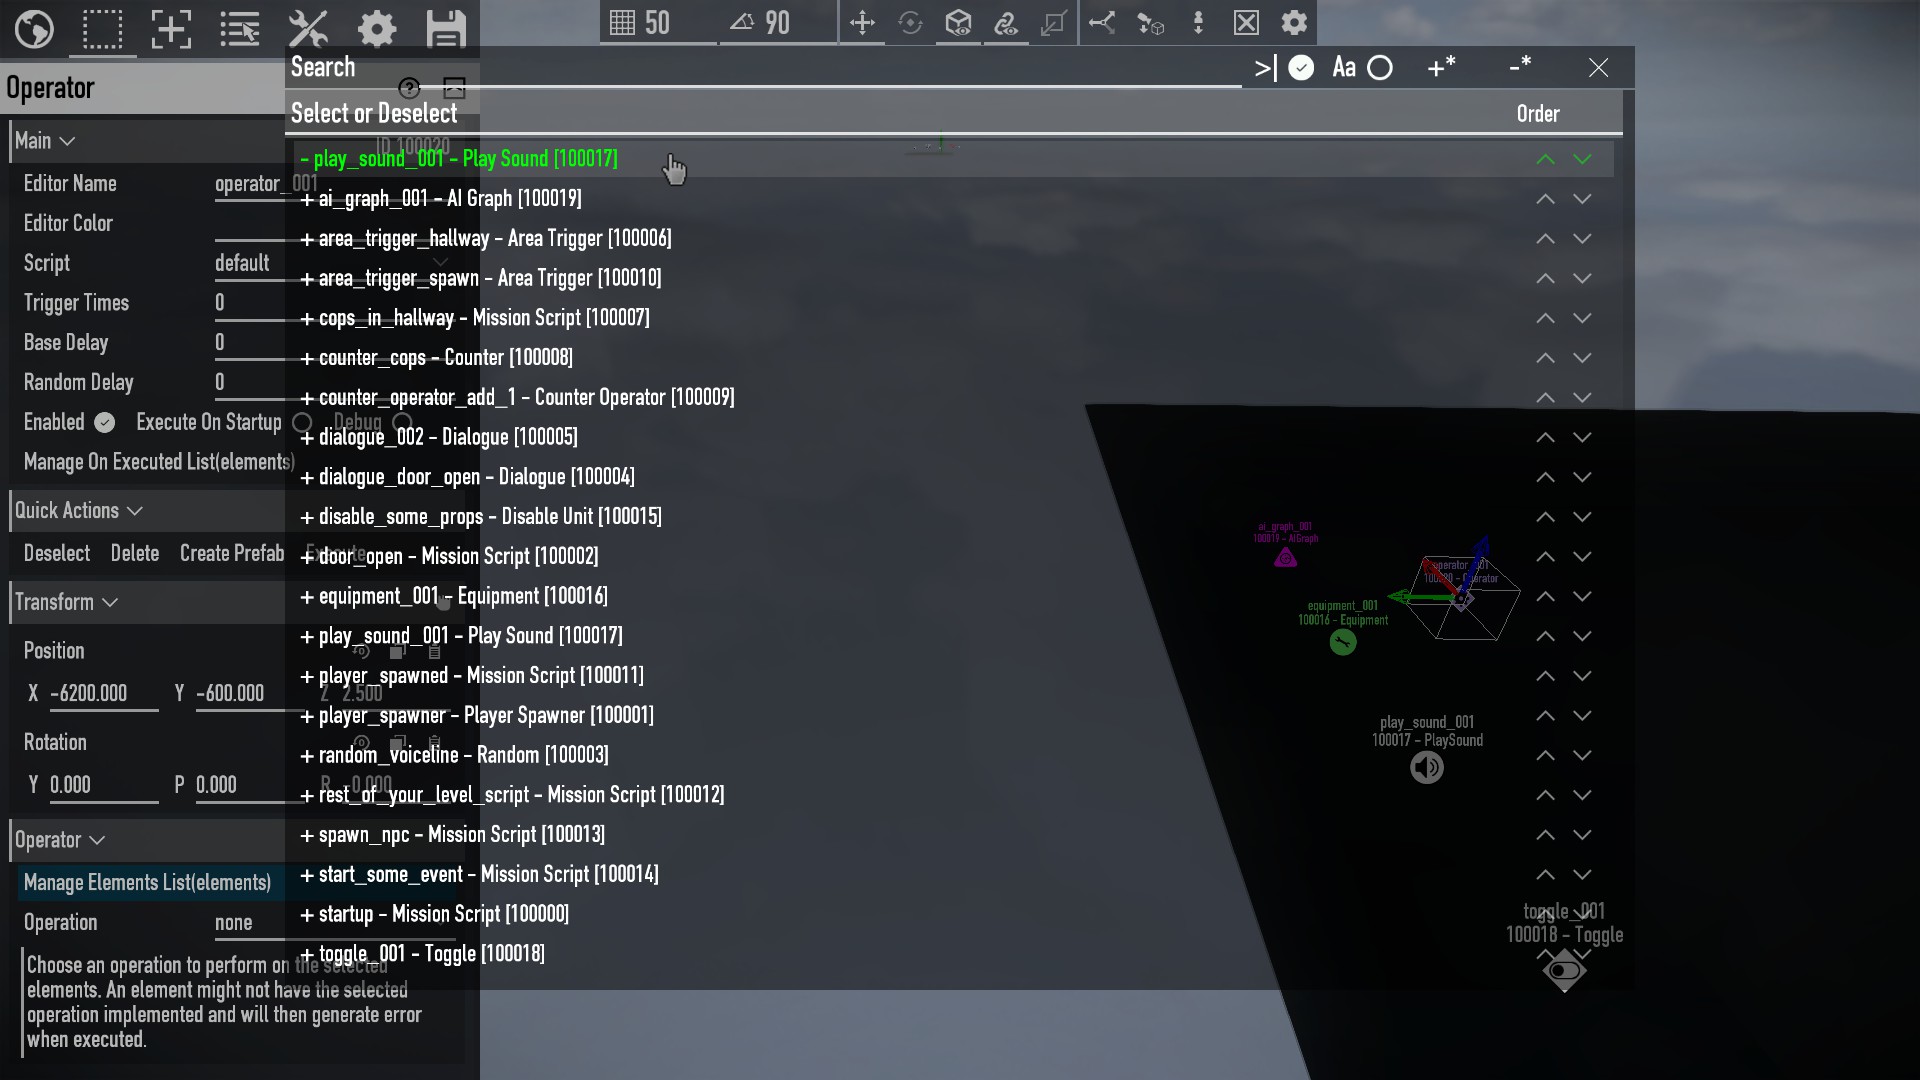
Settings
Selecting an element gives you the following options:
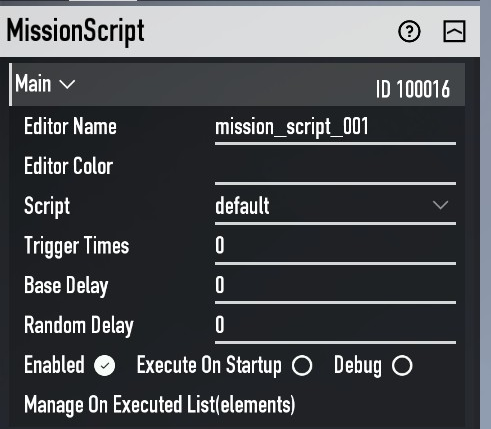
Editor Name Lets you give the element a custom nickname, so you can find it more easily when searching for it.
Editor Color Lets you give the element icon a custom color. This can help in organizing your script or visually highlight certain elements. Default colors for elements can also be defined in the BeardLib Editor Menu Options.
Script Lets you change what script the element belongs to.
Trigger Times Determines how many times the element can be executed. 0 means it can be executed an infinite amount of times. 1 means it will execute once and then disable itself.
Base Delay Adds a specified amount of time in seconds to the execute list and Random Delay adds additional time, randomized between 0 and the amount you specified.
Enabled Lets you enable and disable the element. Disabled elements cannot be executed and will not execute other elements. This state is saved, as it is important for scripting your level.
Execute On Startup Will execute the element as soon as the host has finished loading the level and entered the Loadout screen.
Debug Will give the element the debug flag, for the debug options in the Tools menu.
Manage On Executed Opens a list with all elements that get executed from this element. You can manually search for elements to add here, or add elements by holding CTRL and left clicking elements to execute. Be careful not to accidentally add an element to it's own "On Executed" list, as it will endlessly execute itself and likely cause a stack overflow crash. Use the "Element Loops" tool in the Debug tab of the Tools menu to check for element loops liek this.
Each type of Element then has their own additional setting, depending on what it’s supposed to do.
Equipment for example will add a specified special equipment to the player’s inventory, PlaySound which plays a specified sound, or Toggle which can enable and disable other elements.
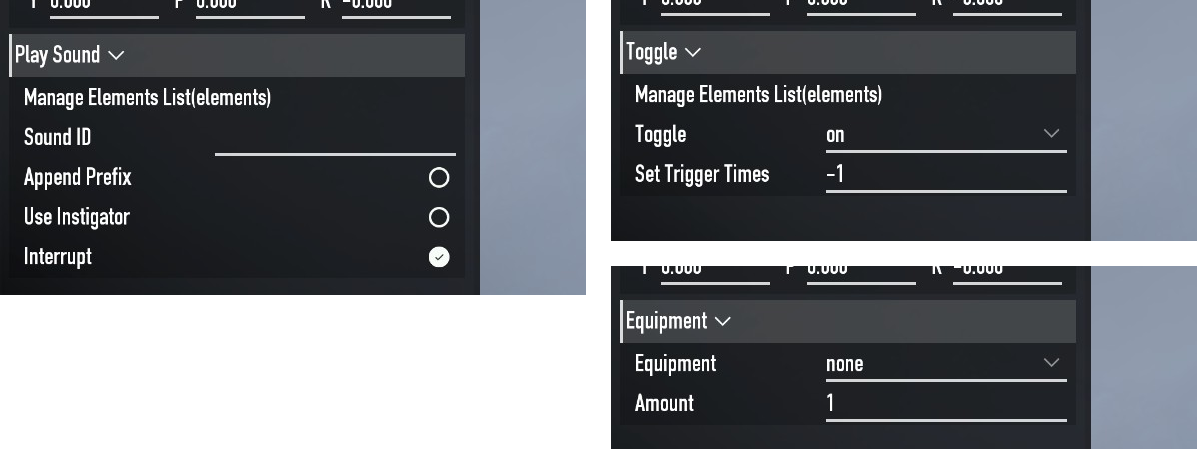 These are just examples, there are way too many elements so listing them here would blow this part out of proportion.
-> Mission Elements Wiki Page
Some Elements require you to link to other elements or units to perform their task on them, like the Toggle, AIGraph or Operator elements. Instead of adding the targeted element or unit to the On Executed list, you have to put it in their own list in the element specific settings by opening it, or holding SPACEBAR while clicking other elements.
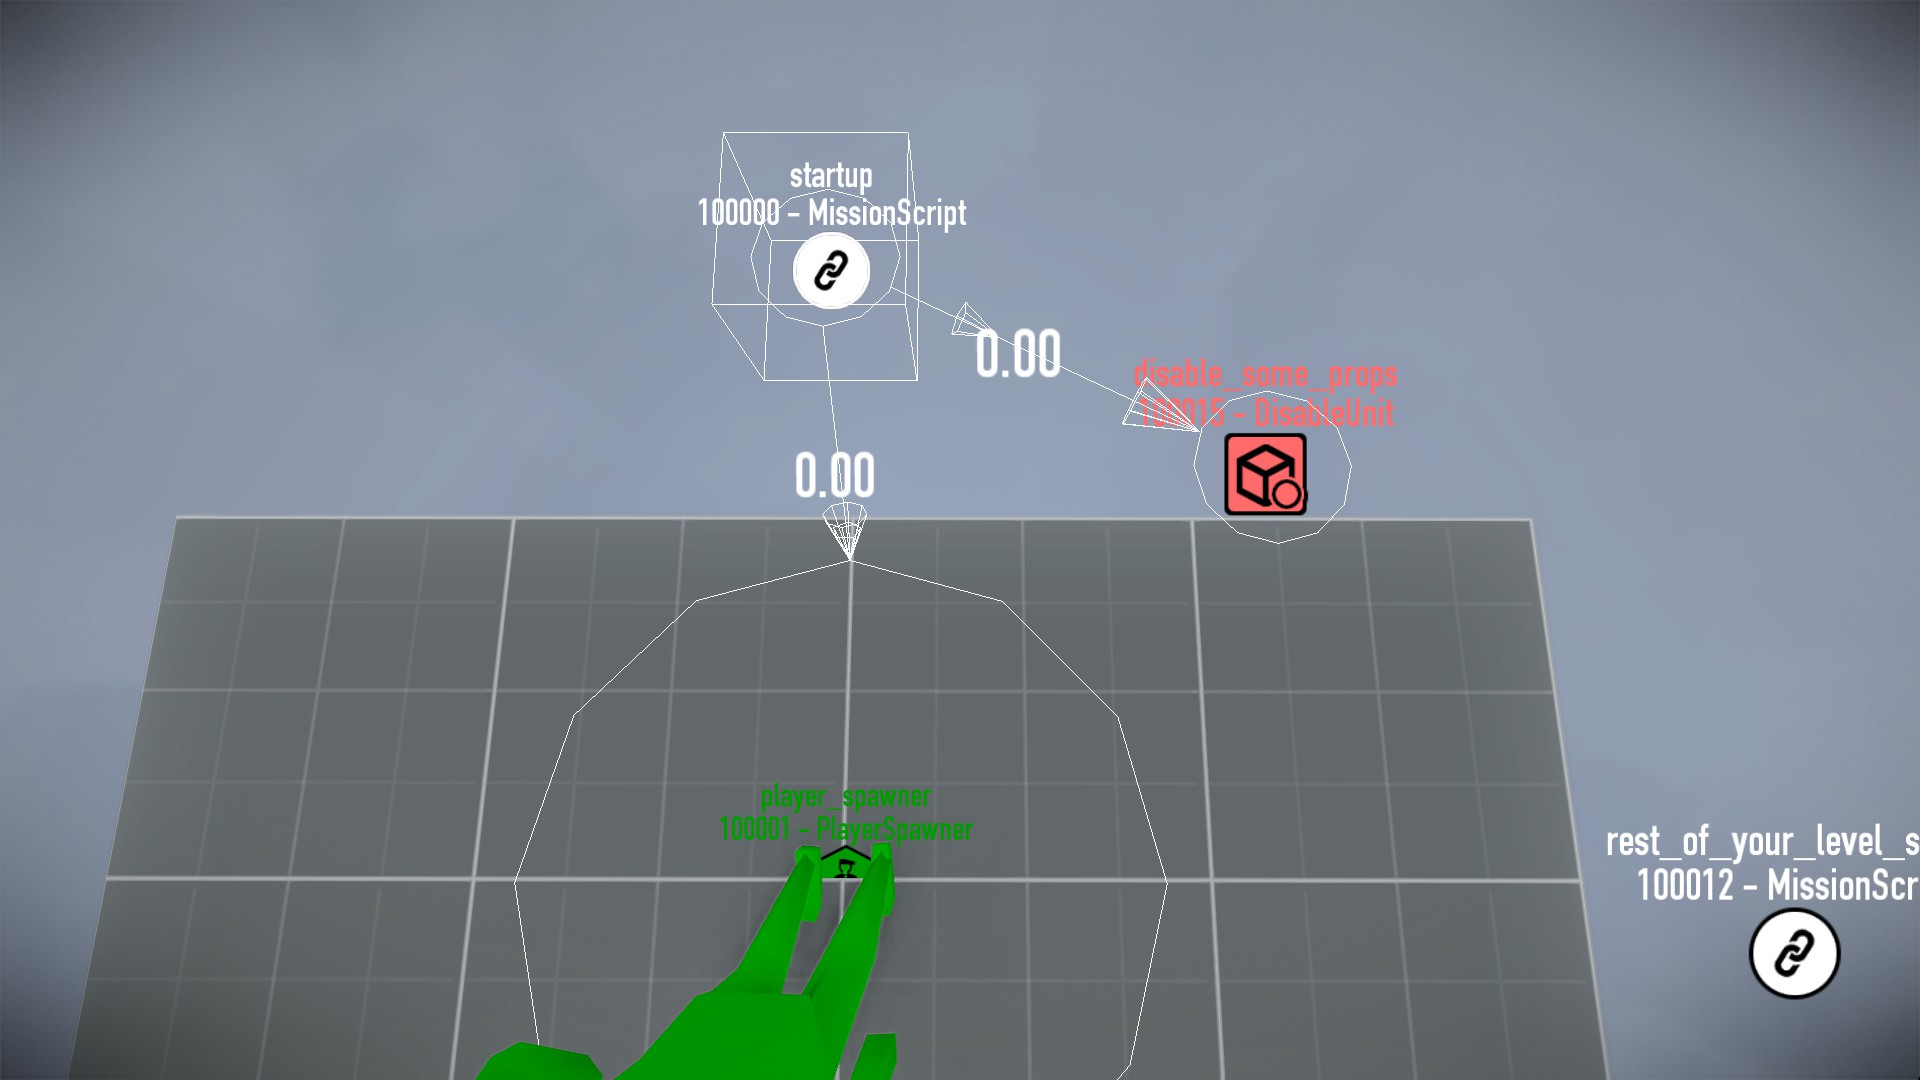
Startup
To start your script when you play the level, at least one element needs to have “Execute On Startup” enabled to trigger the script. This is usually a MissionScript Element. This however should only be used to enable your player spawns, prepare some level layout and set the Whisper State if needed. Since startup triggers as soon as the host enters the loadout screen. This could cause issues with timers, delays and likely desyncs with clients.
Your actual level logic should be triggered with an AreaTrigger so it only starts when all players are actually spawned in your level.
Organization
For organization purposes, your elements should be way above the play area of your level on black planes (units/test/jocke/plane_black_temp). Editable_text units can be used to further label your elements. The planes and the text should also be editor only. This is completely optional, but it massively helps keeping your script organized and readable.
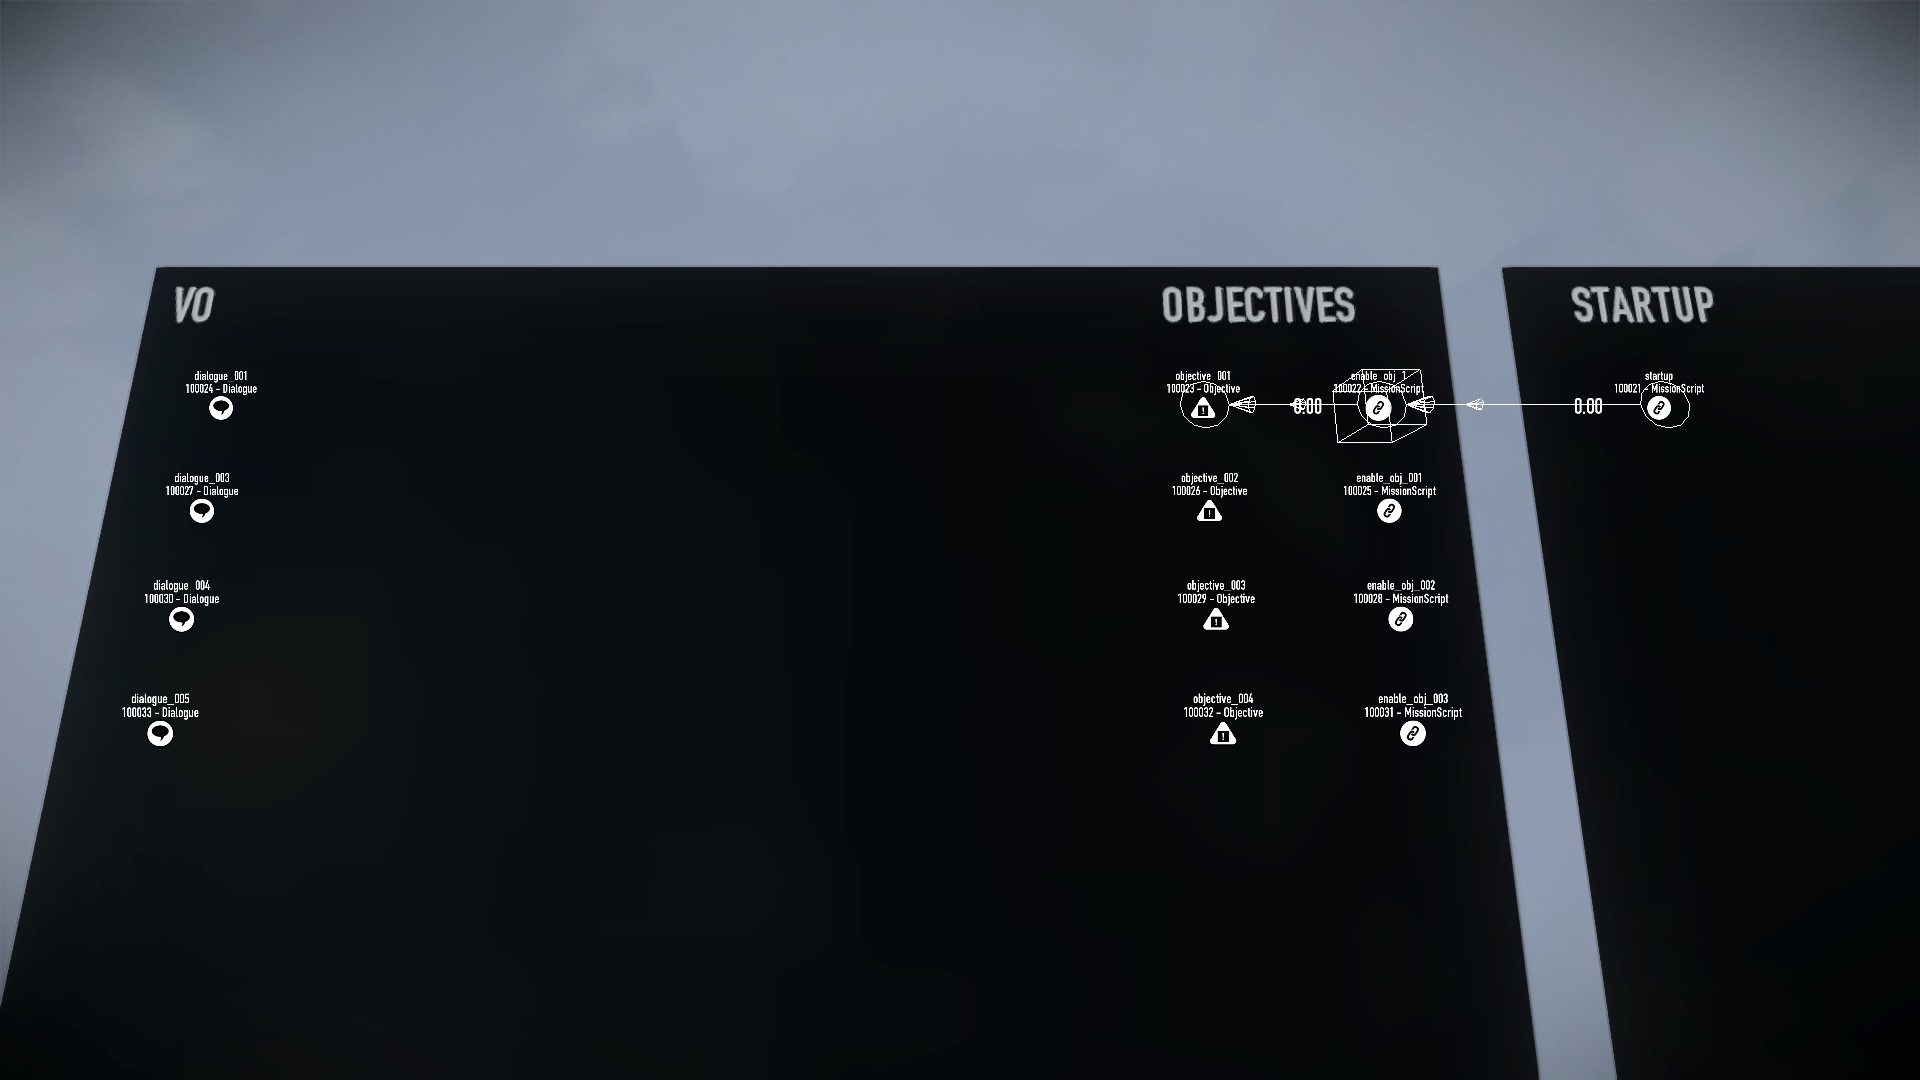
Mission elements on the Dragon Heist. Placed way above the level to be out of the way, organized and labeled to be readable.

Continents And Scripts
Continents
Continents can be compared to layers or groups of units. Every Unit has to be part of a continent, but can be assigned to a different continent at any point. Be aware that the Unit's ID may change when doing this, which could cause issues with Elements it may be linked to. Just double check that your Elements are still linked to the correct unit.

By default every level has a continent called “world” and “editor_only” and more can be created to group up and organize Units however you like. You could for example make a new continent dedicated to only collisions.
Be aware, having more than 9 continents can cause issues with unit IDs and element links.

Continents with the “Editor Only” setting on will only show the Units in it when in the editor. Loading the level through Crime.net will not load them.
Create a new continent by pressing the “plus” icon on the header.

Toggle Visibility will hide and show every unit in the continent.

Add Mission Script will create a new script for elements.

Select All will select every unit from the continent.

In the Continent Settings you can rename it and toggle if it should only be loaded in the editor.


Delete All units will clear the continent of all units.

Remove Continent will delete the continent and all units in it, as well as every script and elements connected to it.

Scripts
Scripts are similar to continents, but for Elements instead. Elements have to be part of a script and can be assigned to a different script at any point. Be aware that element IDs may change when doing this, which could cause issues with Elements or Units it may be linked to. Just double check that your Elements are still linked to the correct unit or Element.

They can only interact with other Elements that are in the same script, not with Elements from other scripts. The only exception is the ExecuteInOtherMission Element, which can execute every element no matter what script it belongs to.
By default, every map has a "Default" script, which belongs to the "World" continent, and you can create as many as you want, under any continent you like.
Scripts are part of continents, so you create new scripts by pressing the “plus” button on the continent you want to add the script to.
Select All will select all elements from the script.

Rename Script lets you give it a new name.

Delete All Elements will clear the script of all elements.

- Remove Script deletes the script and all elements from it.

Current Continent/Script
Current Continent and Current Script refer to the continent and script you’re currently editing. Spawning new units and elements will automatically place them in there.

Sequence And Sequence Triggers
What are sequences
Many Units have what’s called a Sequence Manager. Sequences are pre-defined instructions on how a Unit can change appearance or behavior. They can simply hide and show parts of the model, change textures or enable their interactions, to playing animations, spawning effects and much more.
If you ever shot or hit a window and it broke, that is a sequence being run, that disables the glass plane of the model and spawns an effect. Lockpicking a door is also a sequence, detecting the interaction and playing an animation. Even a Keycard or Crowbar being picked up is a sequence being run.
Sequence Managers in most cases are custom made for the specific Unit.
You can see if a Unit has a Sequence Manager available by selecting it and looking for a “Mesh Variation” option. In there you can select one of the sequences which the unit should run on startup.
UnitSequence Element
A UnitSequence Element can be linked to such a unit by opening the Trigger List either with the button or the M hotkey, or by holding SPACEBAR and clicking on the unit.
With the unit connected you can choose a sequence in the Trigger List.
Executing the Element will then run the selected sequences.


UnitSequenceTrigger Element
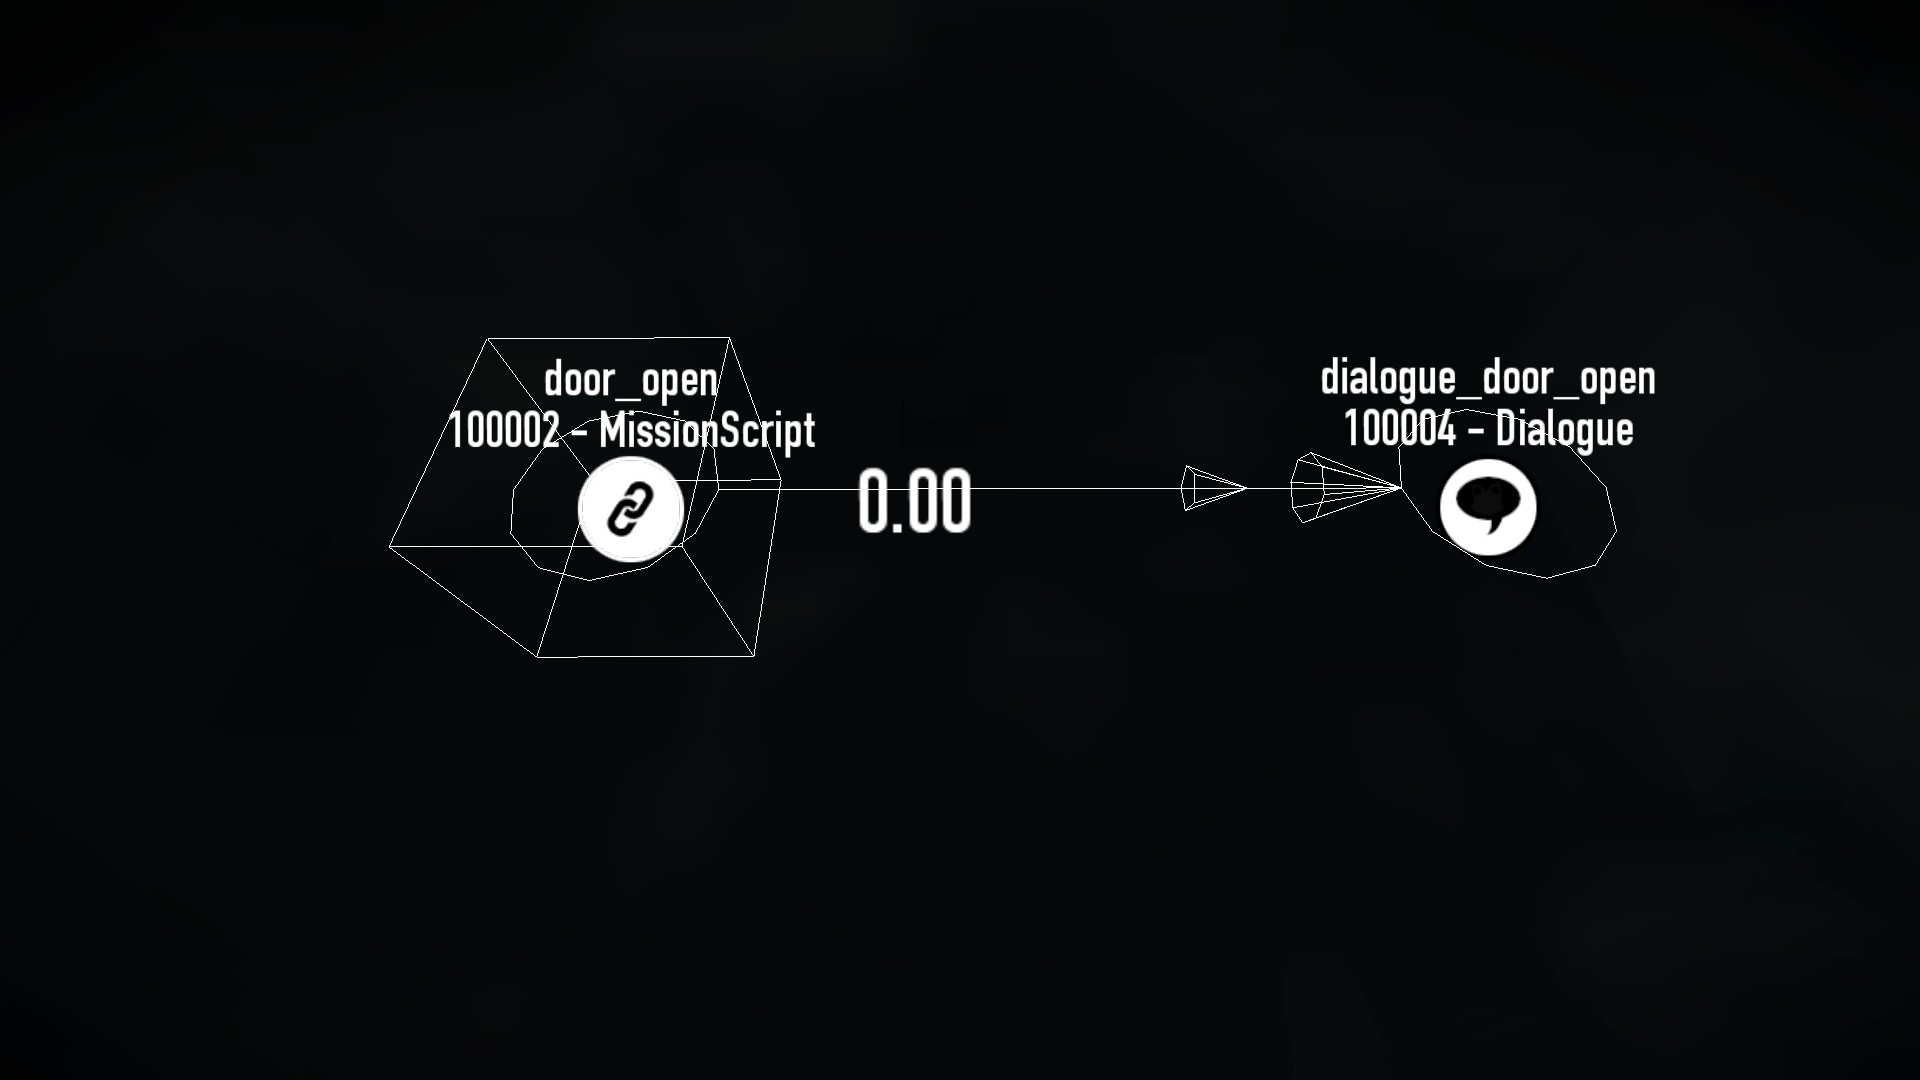
A UnitSequenceTrigger Element can link to those units similarly to a UnitSequence, however instead of running sequences on the unit, the selected sequence being run will trigger the Element which can be used to execute a chain of Elements. You could for example use it to play a voiceline when opening a door by detecting the sequence of the door opening and executing a Dialogue Element.

Asset Management - Database, Packages, and Local Files
Loading Assets
Database
BeardLib can load Assets for your level in different ways. Currently the standard is to load assets from database, also known as DB Loading. BeardLib handles this process automatically when spawning a unit and there is next to no other step required.

However you can also manually load assets with the Load From Database option.

Package
The old method was Package loading. When spawning a Unit, you had to load a package containing said Unit. The downside is that a package also contains lots of other units, taking up memory. In some cases like sound effects or voice lines you may still need to load some, just remember to pick the smallest available packages.

You can load packages with the Load With Packages option.

Local Files / Extract
The third method is Local Files, or extract loading. This means the Unit’s files are actually present inside your Map’s assets folder.

It was used in combination with Package loading to reduce the memory usage of a heist. The downside is that since the files had to be extracted, the space the Map folder takes on your harddrive went up the more Units you load this way, resulting in longer download times. These days Local files are only really used for custom assets.
While extract loading has been removed from the editor entirely, and there isn't really a reason to have do it anymore, you can still include the files into your project with the following method:
Use the Load From Database option, but with the "With Options" toggle on.

After picking your asset in the list you now get the option to include the files in your project.

Dependencies
Some Units are dependent on other assets, like Effects, and those sometimes don’t get loaded properly. In this case you need to manually load them.
You can see the dependencies of a unit by extracting its .unit file using Diesel Bundle Viewer, opening the file in a text editor and checking for a <dependencies> tag.

Those assets need to be loaded for the unit to work, otherwise the game might crash.
Assets Manager
You can manage your loaded assets and packages from the Assets Manager in the Main-Tab.
There you can see a list of every package and a list of every Asset currently loaded in your level.

You have several options on the right side of the screen:
Remove And Unload Unused Assets Will unload all assets that are loaded but not used anywhere. For example a unit that isn't actually spawned in the level.

This sometimes also unloads important assets such as dependencies for units, to prevent this from happening you can tag assets as Used.

They will show up in the list with a green background and will not be unloaded with the Unload Unused Assets button.

Package Report Will let you select any package from the game. When selecting it, all units from the package will be spawned into your level.

Scan Assets Directory Will scan through your project's assets folder and add all files to the add.xml.

Clean Add Xml will clean up your level's add.xml by removing duplicate entries.

Unused Assets
Assets that are loaded but not used are marked in Yellow. While building your level those can stack up really fast, since just clicking on a unit in the spawn list will already load it. Before releasing your map you should make sure to unload all units that are not used and not needed to reduce memory usage.

Unloaded Assets
Assets marked in Red are assets that are spawned in your level despite not being loaded.

Usually BeardLib automatically loads missing assets when opening your level and notifies you about them.

You can easily fix these with by either loading a package that's containing them, loading them directly from database or just remove them from your level.

add.xml
The add.xml tells BeardLib what assets are needed when loading into your level. It’s unique for every level and can be found in *Your Project*/levels/*your level*/add.xml.
Assets loaded in-editor will be added here automatically, but you can always edit it manually using a text editor.

Memory Usage
PAYDAY 2 has a theoretical limit of about 3.5GB (3500MB), but usually you’re gonna crash at around 3200-3300MB.
To keep your used memory as low as possible, you should load as few packages as possible and unload unused assets.
Additionally assets that are only used inside your level, such as voicelines, interactions or hooks, should only be loaded while in your level.
You can see how much memory your level is using with the -qa launch property.

Playtesting
You enter playtest mode by pressing F10 on your keyboard. The loadout screen opens and elements set to Execute on Startup will be executed. You can buy assets, enter PrePlanning if set up, change weapons and music just as if you opened the level through Crime.net. Ready up to get spawned in the level.
You can run around, shoot and interact as usual and return to editor mode at any time by pressing F10 again, while the game continues to run in the background.
While building your level layout, it’s fine to save while a playtest is running. However it’s highly advised not to do so in later stages with navigation and logic set up, as it has a high chance of breaking.
Sometimes elements don't properly link to each other unless you reload the level. If you want to test a script you should save and reload the level before testing to make sure the elements are actually linked.